When I wrote my preview DigiMixer post, I was awaiting the arrival of my latest mixer: a Behringer Wing Rack. It arrived a few days later, and I’m pleased to say it didn’t take long to integrate it with DigiMixer. (It’s now my main mixer.) While most of the integration was smooth sailing, there’s one aspect of the Wing which doesn’t quite fit the abstraction – which makes it a good subject for a blog post.
Wing outputs
In the real world (as opposed to the contrived examples typically given in courses), abstractions break a bit all the time. The world doesn’t fit as neatly into boxes as we might like. It’s important to differentiate between an abstraction which is deliberately lossy, and an actual “breakage” in the abstraction. A lossy abstraction ignores some details that are unimportant for how we want to use the abstraction. For example, DigiMixer is very lossy in terms of mixer functionality: it doesn’t try to model the routing of the mixer, or any FX that can be applied, or how inputs can be configured in terms of pre-amp gain, trim, stereo panning etc. That’s all fine, and while the Wing has a lot of functionality that isn’t captured in the abstraction, there’s nothing new there.
But the abstraction breaks when it fails to represent aspects that we do care about. In the case of the Wing, that’s the main outputs. Let’s revisit what I mentioned about channels before:
Each channel has information about:
- Its name
- Its fader level (and for input channels, this is “one fader level per output channel”). This can be controlled by the application.
- Whether it’s muted or not. This can be controlled by the application.
- Meter information (i.e. current input and output levels)
Mixers all have input and output channels. There are different kinds of inputs, and different kinds of outputs, but for the most part we don’t need to differentiate between those “kinds”. The mixer may well do so, but DigiMixer doesn’t have to. It does have the concept of a “main” output, which is assumed to be a single stereo output channel. This has a preset pair of channel IDs (100 and 101), and the X-Touch Mini integration does treat this specially, with an assumption that the rotary encoders at the top should be used to control the main level for each input. But for the most part, it’s just considered a normal channel, with its own volume fader and mute.
Interlude: the path of an audio signal
I want to take a moment to make sure I’ve been clear about how audio paths work, at least in a simple form. Let’s imagine we have a simple mixer with two inputs, and one main output. Forget about mono/stereo for the moment.
We’d have three faders (the physical sliders that are used to control volume):
- One for input 1
- One for input 2
- One for the output
That means if you’ve got someone singing into a microphone for input 1, and an electric guitar providing input 2, you can:
- Change the balance between the singing and the guitar by adjusting the input faders
- Change the overall volume by adjusting the output faders
There would also be three mute buttons: one for each input, and one for the output. So if the microphone started getting feedback, you could mute just that (but leave the guitar audible), or you could mute everything with the output mute.
If we had two outputs instead – let’s call them “main” and “aux” – there would be six faders (logically, at least – on a physical console they’d be unlikely to all be separate sliders):
- One for the signal for input 1 feeding the main output
- One for the signal for input 1 feeding the aux output
- One for the signal for input 2 feeding the main output
- One for the signal for input 2 feeding the aux output
- One for the main output
- One for the aux output
The ability to apply different fader levels to different inputs for different outputs is something we use at my church every week: we have one microphone picking up the congregation singing, so that we can send that over Zoom… but we don’t want to amplify that at all in the church building. Likewise for someone speaking, we might amplify it more in the building that on Zoom, or vice versa.
The way DigiMixer models mutes, there’s just one mute per input and one per output though, so on our “two output” mixer we’d have six faders, but only four mutes. In reality, most mixers actually provide “per input, per output” muting, but also have the concept of linked mutes where muting an input channel mutes it for all outputs.
But the upshot of all of this is that even in our simplified model, the audio signal from an input to an output is going via a path containing two faders and two mutes: there are multiple ways to adjust the volume or apply a mute, depending on what you’re trying to do.
With that in mind, let’s get back to the Wing…
Main LR vs Main 1-4 on the Wing
The Behringer Wing has lots of channels: 48 stereo input channels and 20 stereo output channels (plus matrix mixes and other funky stuff – I’m simplifying a lot here, and frankly I’m a very long way from fully understanding the capabilities of the Wing). The outputs are divided into four main channels (M1-M4), and 16 bus channels (B1-B16). Each of those outputs has a series of per-input faders, and its own overall output fader, and a mute. So far, so good.
And then there’s “Main LR”.
“Main LR” sounds like it should be a regular stereo main output channel, with channel IDs 100 and 101, with no problems. In terms of each input having a fader for Main LR, that works out fine.
But Main LR isn’t actually an output in itself. It doesn’t have its own “overall” fader, or a mute. It doesn’t have a meter level. You can’t route it to anything. The input levels adjusted with the faders are applied to all of M1-M4, before also being adjusted by the input-to-M1-to-M4 faders. So if you have a single input that’s sent from M1 to a speaker, you have three faders you can use to adjust that:
- The Main LR fader for the input
- The M1 fader for the input
- The overall M1 fader
There are two mute options in that scenario:
- The mute for the input
- The mute for M1
Main LR in DigiMixer
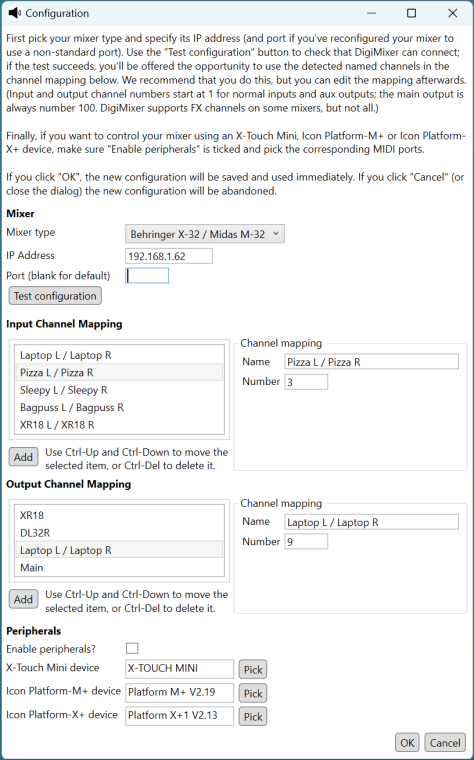
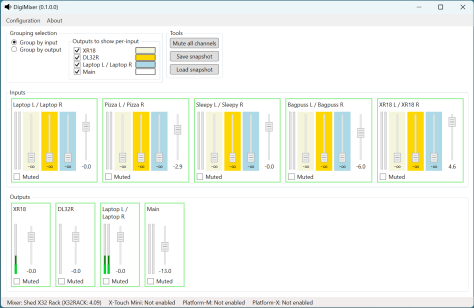
All of this can be represented in DigiMixer – we can add a “fake” output channel for Main LR – and indeed it’s useful to do so, as the sort of “primary input” fader adjusted with the rotary encoders on the X-Touch Mini.
But then we get three things we don’t want, because they have no representation on the mixer itself:
- A Main LR overall fader
- A Main LR meter
- A Main LR mute
The abstraction doesn’t have enough nuance to represent this – it has no concept of “an output channel that is only used for input faders”.
Those three extra bits ended up being shown in DigiMixer as useless bits of user interface. I’m no UI designer (as I think we’ve already established via screenshots in previous parts) but even I know enough to be repulsed by UI elements which do nothing.
Addressing a broken abstraction
Hopefully I’ve done a reasonable job of explaining how the DigiMixer abstraction I described before ends up falling short for the Wing. (If not, please leave a comment and I’ll try to make it clearer. I suspect it’s fundamentally tricky to full “get” it without just playing with a real life mixer, simply moving different faders to see what happens.)
The next step is presumably to fix the abstraction, right? Well, maybe. I came up with three options, and I think these are probably reasonably representative of the options available in most similar cases.
Option 1: Ignore it
The UI sucks with a meter that never displays anything, and a fader and mute button that appear to be operative, but don’t actually adjust the mixer at all.
But… but all the UI elements which should work do. It’s much better than missing the Main LR channel out entirely, which would reduce functionality.
I could have ignored the problem entirely. Sometimes that’s an absolutely fine thing to do – it’s important to weigh the actual consequences of the abstraction break against the cost of addressing it. This is where it’s important to take into account how much knowledge you have of how the abstraction will be used. The DigiMixer applications (plural, but all written by me) are the only consumers of the DigiMixer abstraction. Unless someone else starts writing their own applications (which is possible I guess – it’s all open source) I can reason about all the impacts of the breakage.
If this were Noda Time for example, it would be a different matter – people use Noda Time for all kinds of things. That doesn’t mean that there aren’t sharp corners in the abstractions exposed in Noda Time, of course. I could fill multiple blog posts with those – including how I’ve considered fixing them, compatibility concerns, etc.
Option 2: Expand the abstraction
It wouldn’t be very hard to make the core abstraction in DigiMixer more informative. It would really just be a matter of updating the MixerChannelConfiguration which is returned from DetectMixerConfiguration to contain more per-channel details. At least, that would be the starting point: that information would then be consumed in the “middle” layer, and exposed upward again to the application layer.
I could have implemented this option directly… but one thing still bothers me: there may be another change around the corner. Expanding the abstraction to fit perfectly with the Wing risks making life harder later, when there’s another mixer which breaks the model in some slightly different way. I’d prefer to wait until I’ve got more points to draw a straight line through, if you see what I mean.
There’s a risk and an open question with the “wait and see” strategy, of course: how long do I wait? If I haven’t seen anything similar in six months, should I “do the job properly” at that point? Maybe a year? The longer I wait, the longer I’ve got some ugliness in the code – but the sooner I stop waiting, the higher the chance that something else will come up.
Again, this aspect of timing is pretty common in abstractions which are rather more important than DigiMixer. The costs typically go up as well: if DigiMixer had been published as a set of NuGet packages following Semantic Versioning then I’d either have to try to work out how to expand the abstraction without making breaking changes, or bump to a new major version.
Option 3: Embrace the leakiness
For the moment, I’ve chosen to leave the abstraction broken in the lower levels, and address the problem just in the application layer. The WPF user controls I’d already created made it easy enough to use data binding to conditionalise whether the mute and meters are visible. The faders are slightly fiddlier, partly due to the two “modes” of DigiMixer applications: grouping inputs by output, or grouping outputs by input. Basically this winds up being about deciding which faders to include in collections.
The next question was how to prime the view model with the right information. This could have been done in the configuration file – but that would have had the same sort of issues as option 2. Instead, I went full-on dirty: when setting up the mixer view model, the code knows what the hardware type is (via the config). So we can just say “If it’s a Behringer Wing, tweak things appropriately”:
// The Wing has a "Main LR" channel which doesn't have its own overall fader, mute or meter.
// We don't want to show those UI elements, but it's an odd thing to model on its own.
// For the moment, we detect that we're using a Wing and just handle things appropriately.
if (Config.HardwareType == DigiMixerConfig.MixerHardwareType.BehringerWing)
{
    // Note: no change for InputChannels, as we *want* the fader there.
    // Remove the "overall output" fader, meters and mute for Main LR when grouping by output.
    foreach (var outputChannel in OutputChannels)
    {
        if (outputChannel.ChannelId.IsMainOutput)
        {
            outputChannel.RemoveOverallOutputFader();
            outputChannel.HasMeters = false;
            outputChannel.HasMute = false;
        }
    }
    // Remove the whole "overall output" element when grouping by output.
    OverallOutputChannels = OverallOutputChannels.Where(c => !c.ChannelId.IsMainOutput).ToReadOnlyList();
}
This bit of code violates the point of having an abstraction in the first place. The mixer view model isn’t meant to know or care what hardware it’s talking to! And yet… and yet, it works.
I’m not suggesting this is generally the right approach. But sometimes, it’s a practical one. It’s definitely something to be careful with – if I have to add a similar block for the next mixer, I’ll be much more reluctant. This is an example of technical debt that I’ve deliberately taken on. I would like to remove it in the future – I’m hopeful that in the future I’ll have more information to guide me in moving to option 2. For the moment, I’ll live with it.
Conclusion
I always said I wanted DigiMixer to show the real-world problems with abstractions as well as the clean side of things. I hadn’t expected to get quite such a clear example so soon after the last post.
In my next post – if all goes to plan – I’ll look at a design challenge that sounds simple, but took me a long time to reach my current approach. We’ll look at “units” together, in terms of both faders and meters. Hopefully that’ll be more interesting than this paragraph makes it sound…