When Abstractions Break

When I wrote my preview DigiMixer post, I was awaiting the arrival of my latest mixer: a Behringer Wing Rack. It arrived a few days later, and I’m pleased to say it didn’t take long to integrate it with DigiMixer. (It’s now my main mixer.) While most of the integration was smooth sailing, there’s one aspect of the Wing which doesn’t quite fit the abstraction – which makes it a good subject for a blog post.

Wing outputs

In the real world (as opposed to the contrived examples typically given in courses), abstractions break a bit all the time. The world doesn’t fit as neatly into boxes as we might like. It’s important to differentiate between an abstraction which is deliberately lossy, and an actual “breakage” in the abstraction. A lossy abstraction ignores some details that are unimportant for how we want to use the abstraction. For example, DigiMixer is very lossy in terms of mixer functionality: it doesn’t try to model the routing of the mixer, or any FX that can be applied, or how inputs can be configured in terms of pre-amp gain, trim, stereo panning etc. That’s all fine, and while the Wing has a lot of functionality that isn’t captured in the abstraction, there’s nothing new there.

But the abstraction breaks when it fails to represent aspects that we do care about. In the case of the Wing, that’s the main outputs. Let’s revisit what I mentioned about channels before:

Each channel has information about:

  • Its name
  • Its fader level (and for input channels, this is “one fader level per output channel”). This can be controlled by the application.
  • Whether it’s muted or not. This can be controlled by the application.
  • Meter information (i.e. current input and output levels)

Mixers all have input and output channels. There are different kinds of inputs, and different kinds of outputs, but for the most part we don’t need to differentiate between those “kinds”. The mixer may well do so, but DigiMixer doesn’t have to. It does have the concept of a “main” output, which is assumed to be a single stereo output channel. This has a preset pair of channel IDs (100 and 101), and the X-Touch Mini integration does treat this specially, with an assumption that the rotary encoders at the top should be used to control the main level for each input. But for the most part, it’s just considered a normal channel, with its own volume fader and mute.

Interlude: the path of an audio signal

I want to take a moment to make sure I’ve been clear about how audio paths work, at least in a simple form. Let’s imagine we have a simple mixer with two inputs, and one main output. Forget about mono/stereo for the moment.

We’d have three faders (the physical sliders that are used to control volume):

  • One for input 1
  • One for input 2
  • One for the output

That means if you’ve got someone singing into a microphone for input 1, and an electric guitar providing input 2, you can:

  • Change the balance between the singing and the guitar by adjusting the input faders
  • Change the overall volume by adjusting the output faders

There would also be three mute buttons: one for each input, and one for the output. So if the microphone started getting feedback, you could mute just that (but leave the guitar audible), or you could mute everything with the output mute.

If we had two outputs instead – let’s call them “main” and “aux” – there would be six faders (logically, at least – on a physical console they’d be unlikely to all be separate sliders):

  • One for the signal for input 1 feeding the main output
  • One for the signal for input 1 feeding the aux output
  • One for the signal for input 2 feeding the main output
  • One for the signal for input 2 feeding the aux output
  • One for the main output
  • One for the aux output

The ability to apply different fader levels to different inputs for different outputs is something we use at my church every week: we have one microphone picking up the congregation singing, so that we can send that over Zoom… but we don’t want to amplify that at all in the church building. Likewise for someone speaking, we might amplify it more in the building that on Zoom, or vice versa.

The way DigiMixer models mutes, there’s just one mute per input and one per output though, so on our “two output” mixer we’d have six faders, but only four mutes. In reality, most mixers actually provide “per input, per output” muting, but also have the concept of linked mutes where muting an input channel mutes it for all outputs.

But the upshot of all of this is that even in our simplified model, the audio signal from an input to an output is going via a path containing two faders and two mutes: there are multiple ways to adjust the volume or apply a mute, depending on what you’re trying to do.

With that in mind, let’s get back to the Wing…

Main LR vs Main 1-4 on the Wing

The Behringer Wing has lots of channels: 48 stereo input channels and 20 stereo output channels (plus matrix mixes and other funky stuff – I’m simplifying a lot here, and frankly I’m a very long way from fully understanding the capabilities of the Wing). The outputs are divided into four main channels (M1-M4), and 16 bus channels (B1-B16). Each of those outputs has a series of per-input faders, and its own overall output fader, and a mute. So far, so good.

And then there’s “Main LR”.

“Main LR” sounds like it should be a regular stereo main output channel, with channel IDs 100 and 101, with no problems. In terms of each input having a fader for Main LR, that works out fine.

But Main LR isn’t actually an output in itself. It doesn’t have its own “overall” fader, or a mute. It doesn’t have a meter level. You can’t route it to anything. The input levels adjusted with the faders are applied to all of M1-M4, before also being adjusted by the input-to-M1-to-M4 faders. So if you have a single input that’s sent from M1 to a speaker, you have three faders you can use to adjust that:

  • The Main LR fader for the input
  • The M1 fader for the input
  • The overall M1 fader

There are two mute options in that scenario:

  • The mute for the input
  • The mute for M1

Main LR in DigiMixer

All of this can be represented in DigiMixer – we can add a “fake” output channel for Main LR – and indeed it’s useful to do so, as the sort of “primary input” fader adjusted with the rotary encoders on the X-Touch Mini.

But then we get three things we don’t want, because they have no representation on the mixer itself:

  • A Main LR overall fader
  • A Main LR meter
  • A Main LR mute

The abstraction doesn’t have enough nuance to represent this – it has no concept of “an output channel that is only used for input faders”.

Those three extra bits ended up being shown in DigiMixer as useless bits of user interface. I’m no UI designer (as I think we’ve already established via screenshots in previous parts) but even I know enough to be repulsed by UI elements which do nothing.

Addressing a broken abstraction

Hopefully I’ve done a reasonable job of explaining how the DigiMixer abstraction I described before ends up falling short for the Wing. (If not, please leave a comment and I’ll try to make it clearer. I suspect it’s fundamentally tricky to full “get” it without just playing with a real life mixer, simply moving different faders to see what happens.)

The next step is presumably to fix the abstraction, right? Well, maybe. I came up with three options, and I think these are probably reasonably representative of the options available in most similar cases.

Option 1: Ignore it

The UI sucks with a meter that never displays anything, and a fader and mute button that appear to be operative, but don’t actually adjust the mixer at all.

But… but all the UI elements which should work do. It’s much better than missing the Main LR channel out entirely, which would reduce functionality.

I could have ignored the problem entirely. Sometimes that’s an absolutely fine thing to do – it’s important to weigh the actual consequences of the abstraction break against the cost of addressing it. This is where it’s important to take into account how much knowledge you have of how the abstraction will be used. The DigiMixer applications (plural, but all written by me) are the only consumers of the DigiMixer abstraction. Unless someone else starts writing their own applications (which is possible I guess – it’s all open source) I can reason about all the impacts of the breakage.

If this were Noda Time for example, it would be a different matter – people use Noda Time for all kinds of things. That doesn’t mean that there aren’t sharp corners in the abstractions exposed in Noda Time, of course. I could fill multiple blog posts with those – including how I’ve considered fixing them, compatibility concerns, etc.

Option 2: Expand the abstraction

It wouldn’t be very hard to make the core abstraction in DigiMixer more informative. It would really just be a matter of updating the MixerChannelConfiguration which is returned from DetectMixerConfiguration to contain more per-channel details. At least, that would be the starting point: that information would then be consumed in the “middle” layer, and exposed upward again to the application layer.

I could have implemented this option directly… but one thing still bothers me: there may be another change around the corner. Expanding the abstraction to fit perfectly with the Wing risks making life harder later, when there’s another mixer which breaks the model in some slightly different way. I’d prefer to wait until I’ve got more points to draw a straight line through, if you see what I mean.

There’s a risk and an open question with the “wait and see” strategy, of course: how long do I wait? If I haven’t seen anything similar in six months, should I “do the job properly” at that point? Maybe a year? The longer I wait, the longer I’ve got some ugliness in the code – but the sooner I stop waiting, the higher the chance that something else will come up.

Again, this aspect of timing is pretty common in abstractions which are rather more important than DigiMixer. The costs typically go up as well: if DigiMixer had been published as a set of NuGet packages following Semantic Versioning then I’d either have to try to work out how to expand the abstraction without making breaking changes, or bump to a new major version.

Option 3: Embrace the leakiness

For the moment, I’ve chosen to leave the abstraction broken in the lower levels, and address the problem just in the application layer. The WPF user controls I’d already created made it easy enough to use data binding to conditionalise whether the mute and meters are visible. The faders are slightly fiddlier, partly due to the two “modes” of DigiMixer applications: grouping inputs by output, or grouping outputs by input. Basically this winds up being about deciding which faders to include in collections.

The next question was how to prime the view model with the right information. This could have been done in the configuration file – but that would have had the same sort of issues as option 2. Instead, I went full-on dirty: when setting up the mixer view model, the code knows what the hardware type is (via the config). So we can just say “If it’s a Behringer Wing, tweak things appropriately”:

// The Wing has a "Main LR" channel which doesn't have its own overall fader, mute or meter.
// We don't want to show those UI elements, but it's an odd thing to model on its own.
// For the moment, we detect that we're using a Wing and just handle things appropriately.
if (Config.HardwareType == DigiMixerConfig.MixerHardwareType.BehringerWing)
{
    // Note: no change for InputChannels, as we *want* the fader there.
    // Remove the "overall output" fader, meters and mute for Main LR when grouping by output.
    foreach (var outputChannel in OutputChannels)
    {
        if (outputChannel.ChannelId.IsMainOutput)
        {
            outputChannel.RemoveOverallOutputFader();
            outputChannel.HasMeters = false;
            outputChannel.HasMute = false;
        }
    }
    // Remove the whole "overall output" element when grouping by output.
    OverallOutputChannels = OverallOutputChannels.Where(c => !c.ChannelId.IsMainOutput).ToReadOnlyList();
}

This bit of code violates the point of having an abstraction in the first place. The mixer view model isn’t meant to know or care what hardware it’s talking to! And yet… and yet, it works.

I’m not suggesting this is generally the right approach. But sometimes, it’s a practical one. It’s definitely something to be careful with – if I have to add a similar block for the next mixer, I’ll be much more reluctant. This is an example of technical debt that I’ve deliberately taken on. I would like to remove it in the future – I’m hopeful that in the future I’ll have more information to guide me in moving to option 2. For the moment, I’ll live with it.

Conclusion

I always said I wanted DigiMixer to show the real-world problems with abstractions as well as the clean side of things. I hadn’t expected to get quite such a clear example so soon after the last post.

In my next post – if all goes to plan – I’ll look at a design challenge that sounds simple, but took me a long time to reach my current approach. We’ll look at “units” together, in terms of both faders and meters. Hopefully that’ll be more interesting than this paragraph makes it sound…

No, the bug is in your code (and mine)

It’s entirely possible that I’ve posted something on this topic before. I know I’ve posted about it on social media before.

Every so often – thankfully not too often – I see a post on Stack Overflow containing something like this:

  • “This looks like a bug in VS.NET”
  • “I’m 100% sure my code is correct”
  • “This seems like a glaring bug.”
  • “Is this a bug in the compiler?”

The last of these is at least phrased as a question, but usually the surrounding text makes it clear that the poster expects that the answer is “yes, it’s a bug in the compiler.”

Sometimes, the bug really is in the library you’re using, or in the JIT compiler, or the C# or Java compiler, or whatever. I’ve reported plenty of bugs myself, including some fun ones I’ve written about previously to do with camera firmware or a unit test that only failed on Linux. But I try to stay in the following mindset:

When my code doesn’t behave how I expect it to, my first assumption is that I’ve gone wrong somewhere.

Usually, that assumption is correct.

So my first steps when diagnosing a problem are always to try to make sure I can actually reproduce the problem reliably, then reproduce it easily (e.g. without having to launch a mobile app or run unit tests on CI), then reproduce it briefly (with as little code as possible). If the problem is in my code, these steps help me find it. If the problem is genuinely in the compiler/library/framework then by the time I’ve taken all those steps, I’m in a much better place to report it.

But hold on: just because I’ve managed to create a minimal way of reproducing the problem doesn’t mean I’ve definitely found a bug. The fault still probably lies with me. At this point, the bug isn’t likely to be in my code in the most common sense (at least for me) of “I meant to do X, but my code clearly does Y.” Instead, it’s more likely that the library I’m using behaves differently to my expectations by design, or the language I’m using doesn’t work the way I expect, even though the compiler’s behaving as specified1.

So the next thing I do is consult the documentation: if I’ve managed to isolate it to a single method not behaving as expected, I’ll read the whole documentation for that method multiple times, making sure there isn’t some extra note or disclaimer that explains what I’m seeing. I’ll look for points of ambiguity where I’ve made assumptions. If it’s a compiler not behaving as expected, I’ll try to isolate the one specific line or expression that confounds my expectation, dig out the specification and look at every nook and cranny. I may well take notes during this stage, if there’s more to it than can easily fit in my head at one time.

At this point, if I still don’t understand the behaviour I’m seeing, it may genuinely be a bug in someone else’s code. But at this point, I’ve not only got a minimal example to post, but I’ve also got a rationale for why I believe the code should behave differently. Then, and only then, I feel ready to report a bug – and I can do so in a way which makes the maintainer’s job as easy as possible.

But most of the time, it doesn’t end up that way – because most of the time, the bug is in my code, or at least in my understanding. The mindset of expecting that the bug is in my code usually helps me find that bug much more quickly than if my expectation is a compiler bug.

There’s one remaining problem: communicating that message without sounding patronising. If I tell someone that the bug is probably in their code, I’m aware it sounds like I’m saying that because I think I’m a better at writing code than they are. That’s not it at all – if I see unexpected behaviour, that’s probably a bug in my code. That’s one of the reasons for writing this post: I’m hoping that by linking to this in Stack Overflow comments, I’ll be able to convey the message a little more positively.


1 This still absolutely happens with C# – and I’ve stopped feeling bad about it. I convene the ECMA task group for standardizing C#. This includes folks whose knowledge of C# goes way deeper than mine, including Mads Torgersen, Eric Lippert, Neal Gafter and Bill Wagner. Even so, in many of our monthly meetings, we find some behaviour that surprises one or all of us. Or we just can’t agree on what the standard says the compiler should be doing, even with the standard right in front of us. It’s simultaneously humbling, exhilarating and hilarious.

Abstraction: Introduction

Finally, several posts in, I’m actually going to start talking about abstraction using DigiMixer as the core example. When I started writing DigiMixer (almost exactly two years ago) I didn’t expect to take so long to get to this point. Even now, I’m not expecting this post to cover “everything about abstraction” or even “all the aspects of abstraction I want to cover with DigiMixer.” I’m hoping this post will be a good starting point for anyone who isn’t really comfortable with the term “abstraction”, explaining it in a relatable way with DigiMixer as a genuine example (as opposed to the somewhat anaemic examples which tend to be used, which often give an impression of simplicity which doesn’t match the real world).

For this post in particular, you might want to fetch the source code – clone https://github.com/jskeet/DemoCode.git and open DigiMixer/DigiMixer.sln.

Project layout

As a general project, DigiMixer contains four different kinds of projects:

  • A core abstraction of a digital mixer – that’s the main topic of these blog posts
  • Several implementations of that abstraction, for different physical mixers
  • Business logic built on top of the abstraction to make it easier to build apps
  • Actual applications (there’s one public DigiMixer WPF app, but I have other applications in private repositories: one that’s very similar to the DigiMixer WPF app, one that’s effectively embedded within another app, and a console application designed to run on a Raspberry Pi with an X-Touch Mini plugged in)

The core abstraction consists of a few interfaces (IMixerApi, IMixerReceiver, IFaderScale), a few structs (MeterLevel, FaderLevel, ChannelId) and a couple of classes (MixerInfo, MixerChannelConfiguration). Apologies for the naming not being great – particularly IMixerApi. (Maybe I should have a whole section on naming, but I’m not sure that I’d be able to say much beyond “naming is hard”.)

The core project contains existing implementations of IMixerReceiver and IFaderScale, so almost all the work in making a new digital mixer work with DigiMixer is in implementing IMixerApi.

Two sides of abstractions: implementation and consumption

Already, just in that list of kinds of project, there’s an aspect of abstraction which took me a long time to appreciate in design terms: there’s an assymetry between designing for implementation and designing for consumption.

When writing code which doesn’t need to fit into any particular interface, I try to anticipate what people using the class want it to look like. What makes it convenient to work with? What operations are always going to be called one after another, and could be simplified into just a single method call? What expectations/requirements are there likely to be in terms of threading, immutability, asynchrony? What expectations does my code have of the calling code, and what promises does it make in return?

It’s much easier to answer these questions when the primary user of the code is “more of your own code”. It’s even easier if it’s internal code, so you don’t even need to get the answers “right” first time – you can change the shape of the code later. But even when you’re not writing the calling code, it’s still relatively simple. You get to define the contract, and then implement it. If the ideal contract turns out to be too hard to implement, you can sacrifice some usability for implementation simplicity. At the time when you publish the class (whatever that means in your particular situation) you know how feasible it is to implement the contract, because you’ve already done it.

Designing interfaces is much harder, because you’re effectively designing the contract for both the interface implementations and the code calling that implementation. You may not know (or at least not know yet) how hard it is to implement the interface for every implementation that will exist, and you may not know how code will want to call the interface. Even if you have a crystal ball and can anticipate all the requirements, they may well be contradictory, in multiple ways. Different implementations may find different design choices harder or easier; different uses of the interface may likewise favour different approaches – and even if neither of those is the case, the “simplest to use” design may well not be the “simplest to implement” design.

Sometimes this can be addressed using abstract classes: the concrete methods in the abstract class can perform common logic which uses protected abstract methods. The implementer’s view is “these are the abstract methods I need to override” while the consumer’s view is “these are the concrete methods I can call.” (Of course, you can make some of the abstract methods public for cases when the ideal consumer and implementer design coincide.)

Layering in DigiMixer

The abstract class approach isn’t the one I took with DigiMixer. Instead, I effectively separated the code into a “core” project which implementers refer to, with relatively low-level concepts, and a higher level project which builds on top of that and is more consumer-friendly. So while mixer implementations implement DigiMixer.Core.IMixerApi, consumers will use the DigiMixer.Mixer class, constructed using a factory method:

public static async Task<Mixer> Create(ILogger logger, Func<IMixerApi> apiFactory, ConnectionTiming? timing = null)

The Mixer class handles reconnections, retaining the status of audio channels etc. As it happens, applications will often use the even-higher-level abstraction provided by DigiMixer.AppCore.DigiMixerViewModel. It’s not unusual to have multiple levels of abstraction like this, although it’s worth bearing in mind that it’s a balancing act – the more layers that are involved, the harder it can be to understand and debug through the code. When the role of each layer is really clear (so it’s obvious where each particular bit of logic should live) then the separation can be hugely beneficial. Of course, in real life it’s often not obvious where logic lives. The separation of layers in DigiMixer has taken a while to stabilise – along with everything else in the project. I’m not going to argue that it’s ideal, but it seems to be “good enough” at the moment.

While I’ve personally found it useful to put different layers in different projects, everything would still work if I had far fewer projects. (Currently I have about three projects per mixer as well, leading to a pretty large solution.) One benefit of separating by project is that I can easily see that my mixer implementations aren’t breaking the intended layer boundaries: they only depend on DigiMixer.Core, not DigiMixer. I have a similar split in most of the mixer implementation code as well, with a “core” project containing low-level primitives and networking, then a higher level one project which has more understanding of the specific audio concepts. (Sometimes that boundary is really fuzzy – I’ve spent quite a lot of time moving things back and forth.)

What’s in IMixerApi and IMixerReceiver?

With that background in place, let’s take a look at IMixerApi and the related interface, IMixerReceiver. My intention isn’t to go into the detail of any of the code at the moment – it’s just to get a sense of what’s included and what isn’t. Here are the declaration of IMixerApi and IMixerReceiver, without any comments. (There are comments in the real code, of course.)

public interface IMixerApi : IDisposable
{
    void RegisterReceiver(IMixerReceiver receiver);
    Task Connect(CancellationToken cancellationToken);
    Task<MixerChannelConfiguration> DetectConfiguration(CancellationToken cancellationToken);
    Task RequestAllData(IReadOnlyList<ChannelId> channelIds);
    Task SetFaderLevel(ChannelId inputId, ChannelId outputId, FaderLevel level);
    Task SetFaderLevel(ChannelId outputId, FaderLevel level);
    Task SetMuted(ChannelId channelId, bool muted);
    Task SendKeepAlive();
    Task<bool> CheckConnection(CancellationToken cancellationToken);
    TimeSpan KeepAliveInterval { get; }
    IFaderScale FaderScale { get; }
}

public interface IMixerReceiver
{
    void ReceiveFaderLevel(ChannelId inputId, ChannelId outputId, FaderLevel level);
    void ReceiveFaderLevel(ChannelId outputId, FaderLevel level);
    void ReceiveMeterLevels((ChannelId channelId, MeterLevel level)[] levels);
    void ReceiveChannelName(ChannelId channelId, string? name);
    void ReceiveMuteStatus(ChannelId channelId, bool muted);
    void ReceiveMixerInfo(MixerInfo info);
}

First, let’s consider what’s not in here: there’s nothing to say how to connect to the mixer – no hostname, no port, no TCP/UDP decision etc. That’s all specific to the mixer – some mixers need multiple ports, some only need one etc. The expectation is that all of that information is provided on construction, leaving the Connect method to actually establish the connection.

Next, notice that some aspects of IMixerApi are only of interest to the next level of abstraction up: Connect, SendKeepAlive, CheckConnection, and KeepAliveInterval. The Mixer class uses those to maintain the mixer connection, creating new instances of the IMixerApi to reconnect if necessary. (Any given instance of an IMixerApi is only connected once. This makes it easier to avoid worrying about stale data from a previous connection etc.) The Mixer is able to report to the application it’s part of whether it is currently connected or not, but the application doesn’t need to perform any keepalive etc.

The remaining methods and properties are all of more interest to the application, because they’re about audio data. They’re never called directly by layers above Mixer, because that maintains things like audio channel state itself – but they’re fundamentally more closely related to the domain of the application. In particular, the mixer’s channel representations proxy calls to SetMuted and SetFaderLevel to the IMixerApi almost directly (except for handling things like stereo channels).

I should explain the purpose of IMixerReceiver: it’s effectively acting as a big event handler. I could have put lots of events on IMixerApi, e.g. MuteStatusChanged, FaderLevelChanged etc… but anything wanting to listen to receive data for some of those aspects usually wants to listen to all of them, so it made sense to me to put them all in one interface. Mixer implements this interface in a private nested class, and registers an instance of that class with each instance of the IMixerApi that it creates.

The DetectConfiguration and RequestAllData methods are effectively part of setting the initial state of a Mixer, so that applications can use the audio channel abstractions it exposes right from the start. The MixerChannelConfiguration is just a list of channel IDs for inputs, another one for outputs, and a list of “stereo pairs” (where a pair of inputs or a pair of outputs are tied together to act in stereo, typically controlled together in terms of fader levels and muting).

The only other interesting member is FaderScale: that’s used to allow the application to interpret FaderLevel values – something I’ll talk about in a whole other blog post.

So what’s the abstraction?

If you were waiting for some inspiring artifact of elegant design, I’m afraid I have to disappoint you. There will be a lot more posts about some of the detailed aspects of the design (and in particular compromises that I’ve had to make), but you’ve seen the basics of the abstraction now. What I’ve found interesting in designing DigiMixer is thinking about three aspects:

Firstly here’s a lot of information about digital mixers that’s not in the abstraction. We have no clue which input channels come from physical XLR sockets, which might be over Dante, etc. There’s no representation at all of any FX plugins that the mixer might expose. In a different abstraction – one that attempted to represent the mixers with greater fidelity – all of that would have to be there. That would add a great deal of complexity. The most critical decision about an abstraction is what you leave out. What do all your implementations have in common that the consumers of the abstraction will need to access in some form or other?

Next, in this specific case, there are various lifecycle-related methods in the abstraction. This could have been delegated to each implementation, but the steps involved in the lifecycle are common enough that it made more sense to put them in the single Mixer implementation, rather than either in each IMixerApi implementation or in each of the applications.

So what is in the abstraction, as far as applications are concerned? There’s a small amount of information about the mixer (in MixerInfo – things like the name, model, firmware version) and the rest is all about input and output channels. Each channel has information about:

  • Its name
  • Its fader level (and for input channels, this is “one fader level per output channel”). This can be controlled by the application.
  • Whether it’s muted or not. This can be controlled by the application.
  • Meter information (i.e. current input and output levels)

Interestingly, although a lot of the details have changed over the last two years, that core functionality hasn’t. This emphasizes the difference between “the abstraction” and “the precise interface definitions used”. If you’d asked me two years ago what mixer functionality I wanted to be in the abstraction, I think I’d have given the points above. That’s almost certainly due to having worked on a non-abstracted version (targeting only the Behringer X-Air series) for nearly two years before DigiMixer started. Where that approach is feasible, I think it has a lot going for it: do something concrete before trying to generalise. (As an aside, I tend to find that’s true with automation as well – I don’t tend to automate a task until I’ve done it so often that it requires no brainpower/judgement at all. At that point, it should be easy to codify the steps… whereas if I’m still saying “Well sometimes I do X, and sometimes I do Y” then I don’t feel ready to automate unless I can pin down the criteria for choosing the X or Y path really clearly.

What’s next?

To some extent, this post has been the “happy path” of abstractions. I’ve tried to give a little bit of insight into the tensions between designing for consumers of the abstraction and designing for implementers, but there have been no particularly painful choices yet.

I expect most of the remaining posts to be about trickier aspects that I’ve really struggled with. In almost all cases, I suspect that when you read the post you may disagree with some of my choices – and that’s fine. (I may not even disagree with your disagreement.) A lot of the decisions we make have a number of trade-offs, both in terms of the purely technical nature, and non-technical constraints (such as how much time I’ve got available to refine a design from “good enough” to “close to ideal”). I’m going to try to be blunt and honest about these, including talking about the constraints where I can still remember them. My hope is that in doing so, you’ll be relieved to see that the constraints you have to work under aren’t so different from everyone else. These will still be largely technical posts, mind you.

I’ll be digging into bits of the design that I happen to find interesting, but if there are any aspects that you’d particularly like to see explained further, please let a comment to that effect and I’ll see what I can do.

Lessons from election night

Introduction

On Thursday (July 4th, 2024) the UK held a general election. There are many, many blog posts, newspaper articles, podcast episodes etc covering the politics of it, and the lessons that the various political parties may need to learn. I, on the other hand, learned very different lessons on the night of the 4th and the early morning of the 5th.

In my previous blog post, I described the steps I’d taken at that point to build my election web site. At the time, there was no JavaScript – I later added the map view, interactive view and live view which all do require JavaScript. Building those three views, adding more prediction providers, and generally tidying things up a bit took a lot of my time in the week and a half between the blog post and the election – but the election night itself was busier still.

Only two things really went “wrong” as such on the night, though they were pretty impactful.

Result entry woes

Firstly, the web site used to crowd source results for Democracy Club had issues. I don’t know the details, and I’m certainly not looking to cause any trouble or blame anyone. But just before 2am, the web site no longer loaded, which means no new results were being added. My site doesn’t use the Democracy Club API directly – instead, it loads data from a Firestore database, and I have a command-line tool to effectively copy the data from the Democracy Club API to Firestore. It worked very smoothly to start with – in fact the first result came in while I was coding a new feature (using the exit poll as another prediction provider) and I didn’t even notice. But obviously, when the results stop being submitted, that’s a problem.

At first, I added the results manually via the Firestore console, clearing the backlog of results that I’d typed into a text document as my wife had been calling them out from the TV. I’d hoped the web site problems were just a blip, and that I could just keep up via the manual result entry while the Democracy Club folks sorted it out. (It seemed unlikely that I’d be able to help fix the site, so I tried to avoid interrupting their work instead.) At one point the web site did come back briefly, but then went down again – at which point I decided to assume that it wouldn’t be reliable again during the night, and that I needed a more efficient solution than using the Firestore console. I checked every so often later on, and found that the web site did come back every so often, but it was down as often as it was up, so after a while I stopped even looking. Maybe it was all sorted by the time I’d got my backup solution ready.

That backup solution was to use Google Sheets. This was what I’d intended from the start of the project, before I knew about Democracy Club at all. I’ve only used the Google Sheets API to scrape data from sheets, but it makes that really quite simple. The code was already set up, including a simple “row to dictionary” mapping utility method, and I already had a lot of the logic to avoid re-writing existing results in the existing tooling targeting Democracy Club – so creating a new tool to combine those bits didn’t take more than about 20 minutes to write. Bear in mind though that this is at 2:30am, with more results coming in all the time, and I’d foolishly had a mojito earlier on.

After a couple of brief teething problems, the spreadsheet result sync tool was in place. I just needed to type the winning party into the spreadsheet next to the constituency name, and every 10 seconds the tool would check for changes and upload any new results. It was a frantic job trying to keep up with the results as they came in (or at least be close to keeping up), but it worked.

Then the site broke, at 5:42am.

Outage! 11 minutes of (partial) downtime

The whole site has been developed rapidly, with no unit tests and relatively little testing in general, beyond what I could easily check with ad hoc data. (In particular, I would check new prediction data locally before deploying to production.) I’d checked a few things with test results, but I hadn’t tested this statement:

Results2024Predicted = context.Predictions.Select(ps => (ps, GetResults(ps.GetPartyOrNotPredicted)))
    // Ignore prediction sets with no predictions in this nation.
    .Where(pair => pair.Item2[Party.NotPredicted] != Constituencies.Count)
    .ToList();

The comment indicates the purpose of the Where call – I have a sort of “fake” value in the Party enum for “this seat hasn’t been predicted, or doesn’t have a result”. That worked absolutely fine – until enough results had come in that at about 5:42am one of the nations (I forget which one) no longer had any outstanding seats. At that point, the dictionary in pair.Item2 (yes, it would be clearer with a named tuple element) didn’t have Party.NotPredicted as a key, and this code threw an exception.

One of the friends I was with spotted that the site was down before I did, and I was already working on it when I received a direct message on Twitter from Sam Freedman about the outage. Yikes. Fortunately by now the impact of the mojito was waning, but the lack of sleep was a significant impairment. In fact it wasn’t the whole site that was down – just the main view. Those looking at the “simple”, “live”, “map” or “interactive” views would still have been fine. But that’s relatively cold comfort.

While this isn’t the fix I would have written with more time, this is what I pushed at 5:51am:

Results2024Predicted = context.Predictions.Select(ps => (ps, GetResults(ps.GetPartyOrNotPredicted)))
    // Ignore prediction sets with no predictions in this nation.
    .Where(pair => !pair.Item2.TryGetValue(Party.NotPredicted, out var count) || count != Constituencies.Count)
    .ToList();

Obviously I tested that locally before pushing to production, but I was certainly keen to get it out immediately. Fortunately, the fix really was that simple. At 5:53am, through the magic of Cloud Build and Kubernetes, the site was up and running again.

So those were the two really significant issues of the night. There were some other mild annoyances which I’ll pick up on below, but overall I was thrilled.

What went well?

Overall, this has been an immensely positive experience. It went from a random idea in chat with a friend on June 7th to a web site I felt comfortable sharing via Twitter, with a reasonable amount of confidence that it could survive modest viral popularity. Links in a couple of Sam Freedman’s posts definitely boosted the profile, and monitoring suggests I had about 30 users with the “live” view which refreshes the content via JavaScript every 10 seconds. Obviously 30 users isn’t huge, but I’ll definitely take it – this is in the middle of the night, with plenty of other ways of getting coverage.

I’ve learned lots of “small” things about Razor pages, HTML, CSS and JavaScript, as well as plenty of broader aspects that I’ve described below.

Other than the short outage just before 6am – which obviously I’m kicking myself about – the site behaved itself really well. The fact that I felt confident deploying a new feature (the exit poll predictions) at 11:30pm, and removing a feature (the swing reporting, which was incorrect based on majority percentages) at 3am is an indication of how happy I am with the code overall. I aimed to create a simple site, and I did so.

What would I do differently next time?

Some of the points below were thoughts I’d had before election night. Some of them were considered before election night, but only confirmed in terms of “yes, this really did turn out to be a problem” on election night. Some were really unexpected.

Don’t drink!

At about 7pm, I’d been expecting to spend the time after the exit poll was announced developing a tool to populate my result database from a spreadsheet, as I hadn’t seen any confirmation from Democracy Club that the results pages were going to be up. During dinner, I saw messages on Slack saying it would all be okay – so I decided it would be okay to have a cocktail just after the exit polls came out. After all, I wasn’t really expecting to be active beyond confirming results on the Democracy Club page.

That was a mistake, as the next 10 hours were spent:

  • Adding the exit poll feature (which I really should have anticipated)
  • Developing the spreadsheet-to-database result populator anyway
  • Frantically adding results to the spreadsheet as quickly as I could

I suspect all of that would have been slightly easier with a clear head.

Avoid clunky data entry where possible (but plan ahead)

When the Democracy Club result confirmation site went down, I wasn’t sure what to do. I had to decide between committing to “I need new tooling now” and accepting that there’d be no result updates while I was writing it, or doing what I could to add results manually via the Firestore console, hoping that the result site would be back up shortly.

I took the latter option, and that was a mistake – I should have gone straight for writing the tool. But really, the mistake was not writing the tool ahead of time. If I’d written the tool days before just in case, not only would I have saved that coding time on the night, but I could also have added more validation to avoid data entry errors.

To be specific: I accidentally copied a load of constituency names into my result spreadsheet where the party names should have been. They were dutifully uploaded to Firestore, and I then deleted each of those records manually. I then pasted the same set of constituency names into the same (wrong) place in the spreadsheet again, because I’m a muppet. In my defence, this was probably at about 6am – but that’s why it would have been good to have written the tool to anticipate data entry errors. (The second time I made the mistake, I adjusted the tool so that fixing the spreadsheet would fix the data in Firestore too.)

Better full cache invalidation than “redeploy the site”

A couple of times – again, due to manual data entry, this time of timestamp values – the site ended up polling data waiting for results to be uploaded two hours in the future. Likewise even before the night itself, my “reload non-result data every 10 minutes” policy was slightly unfortunate. (I’d put a couple of candidates in the wrong seats.) I always had a way of flushing the cache: just redeploy the site. The cache was only in memory, after all. Redeploying is certainly effective – but it’s clunky and annoying.

In the future, I expect to have something in the database to say “reload all data now”. That may well be a Firestore document which also contains other site options such as how frequently to reload other data. I may investigate the IOptionsMonitor interface for that.

Better “no result update” than “site down”

The issue with the site going down was embarrassing, of course. I started thinking about how I could avoid that in the future. Most of the site is really very static – the only thing that drives any change in page content is when some aspect of the data is reloaded. With the existing code, there’s no “load the data” within the serving path – it’s all updated periodically with a background service. The background service then provides an ElectionContext which can be retrieved from all the Razor page code-behind classes, and that’s effectively transformed into a view-model for the page. The view-model is then cached while the ElectionContext hasn’t changed, to avoid recomputing how many seats have been won by each party etc.

The bug that brought the site down – or rather, the main view – was in the computation of the view-model. If the code providing the ElectionContext instead provided the view-model, keeping the view-model computation out of the serving path, then a failure to build the view-model would just mean stale data instead of a page load failure. (At least until the server was restarted, of course.) Admittedly if the code computing the view-model naively transformed the ElectionContext into all the view-models, then a failure in one would cause all the view-models to fail to update. This should be relatively easy to avoid though.

My plan for the future is to have three clear layers in the new site:

  • Underlying model, which is essentially the raw data for the election, loaded from Firestore and normalized
  • View-models, which provide exactly what the views need but which don’t actually depend on anything in ASP.NET Core itself (except maybe HtmlString)
  • The views, with the view-models injected into the Razor pages

I expect to use separate a project for each of these, which should help to enforce layering and make it significantly easier to test the code.

Move data normalization and validation to earlier in the pipeline

The current site loads a lot of data from Google Sheets, using Firestore just for results. There’s a lot of prediction-provider-specific code used to effectively transform those spreadsheets into a common format. This led to multiple problems:

  • In order to check whether the data was valid with the transformation code, I had to start the web site
  • The normalization happened every time the data was loaded
  • If a prediction provider changed the spreadsheet format (which definitely happened…) I had to modify the code for it to handle both the old and the new format
  • Adopting a new prediction provider (or even just a new prediction set) always required redeploying the site
  • Loading data from Google Sheets is relatively slow (compared with Firestore) and the auth model for Sheets is more geared towards user credentials than services

All of this can be fixed by changing the process. If I move from “lots of code in the site to load from Sheets” to “lots of individual tools which populate Firestore, and a small amount of code in the site to read from Firestore” most of those problems go away. The transformation code can load all of the data and validate it before writing anything to Firestore, so we should never have any data that will cause the site itself to have problems. Adding a new prediction set or a new prediction provider should be a matter of adding collections and documents to Firestore, which the site can just pick up dynamically – no site-side code changes required.

The tooling doesn’t even have to load from Google Sheets necessarily. In a couple of cases, my process was actually “scrape HTML from a site, reformat the HTML as a CSV file, then import that CSV file into Google Sheets.” It would be better to just “scrape HTML, transform, upload to Firestore” without all the intermediate steps.

With that new process, I’d have been less nervous about adding the “exit poll prediction provider” on election night.

Capture more data

I had to turn down one feature – listing the size of swings and having a “biggest swings of the night” section – due to not capturing enough data. I’d hoped that “party + majority % in 2019” and “party + majority % in 2024” would be enough to derive the swing, but it doesn’t work quite that way. In the future, I want to capture as much data as possible about the results (both past and present). That will initially mean “all the voting information in each election” but may also mean a richer data model for predictions – instead of bucketing the predictions into toss-up/lean/likely/safe, it would be good to be able to present the original provider data around each prediction, whether that’s a predicted vote share or a “chance of the seat going to this party” – or just a toss-up/lean/likely/safe bucketing. I’m hoping that looking at all the predictions from this time round will provide enough of an idea of how to design that data model for next time.

Tests

Tests are good. I’m supportive of testing. I don’t expect to write comprehensive tests for a future version, but where I can see the benefit, I would like to easily be able to write and run tests. That may well mean just one complex bit of functionality getting a load of testing and everything else being lightweight, but that would be better than nothing.

In designing for testability, it’s likely that I’ll also make sure I can run the site locally without connecting to any Google Cloud services… while I’ll certainly have a Firestore “test” database separate from “prod”, it would be nice if I could load the same data just from local JSON files too.

What comes next?

I enjoyed this whole experience so much that I’ve registered the https://election2029.uk domain. I figure if I put some real time into this, instead of cobbling it all together in under a month, I could really produce something that would be useful to a much larger group of people. At the moment, I’m planning to use Cloud Run to host the site (still using ASP.NET Core for the implementation) but who knows what could change between now and the next election.

Ideally, this would be open source from the start, but there are some issues doing that which could be tricky to get around, at least at the moment. Additionally, I’d definitely want to build on Google Cloud again, and with a site that’s so reliant on data, it would be odd to say “hey, you can look at the source for the site, but the data is all within my Google Cloud project, so you can’t get at it.” (Making the data publicly readable is another option, but that comes with issues too.) Maybe over the next few years I’ll figure out a good way of handling this, but I’m putting that question aside for the moment.

I’m still going to aim to keep it pretty minimal in terms of styling, only using JavaScript where it really makes sense to do so. Currently, I’m not using any sort of framework (Vue, React, etc) and if I can keep things that way, I think I’ve got more chance of being able to understand what I’m doing – but I acknowledge that if the site becomes larger, the benefits of a framework might outweigh the drawbacks. It does raise the question of which one I’d pick though, given the timescale of the project…

Beyond 2029, I’ll be starting to think about retirement. This project has definitely made me wonder whether retiring from full-time commercial work but providing tech tooling for progressive think-tanks might be avery pleasant way of easing myself into fuller retirement. But that’s a long way off…

Building an election website

Introduction

I don’t know much about my blog readership, so let’s start off with two facts that you may not be aware of:

  • I live in the UK.
  • The UK has a general election on July 4th 2024.

I’m politically engaged, and this is a particularly interesting election. The Conservative party have been in office for 14 years, and all the polls show them losing the upcoming election massively. Our family is going to spend election night with some friends, staying up for as many of the results we can while still getting enough sleep for me to drive safely home the next day.

I recently started reading Comment is Freed, the Substack for Sam and Lawrence Freedman. This Substack is publishing an article every day in the run-up to the election, and I’m particularly interested in Sam’s brief per-constituency analysis and predictions. It was this site that made me want to create my own web site for tracking the election results – primarily for on-the-night results, but also for easy information lookup later.

In particular, I wanted to see how accurate the per-seat predictions were with reality. Pollsters in the UK are generally predicting three slightly different things:

  • Overall vote share (what proportion of votes went to each party)
  • Overall seat tallies (in the 650 individual constituencies, how many seats did each party win)
  • Per-seat winners (sometimes with predicted majorities; sometimes with probabilities of winning)

The last of these typically manifests as what is known as an MRP prediction: Multi-level Regression and Poststratification. They’re relatively new, and we’re getting a lot of them in this election.

After seeing those MRPs appear over time, I reflected – and in retrospect this was obvious – that instead of only keeping track of how accurate Sam Freedman’s predictions were, it would be much more interesting to look at the accuracy of all the MRPs I could get permission to use.

At the time of this writing, the site includes data from the following providers:

  • The Financial Times
  • Survation
  • YouGov
  • Ipsos
  • More in Common
  • Britain Elects (as published in The New Stateman)

I’m expecting to add predictions from Focaldata and Sam Freedman in the next week.

Information on the site

The site is at https://jonskeet.uk/election2024, and it just has three pages:

  • The full view (or in colour) contains:
    • Summary information:
    • 2019 (notional) results and 2024 results so far
    • Predictions and their accuracy so far (in terms of proportion of declared results which were correctly called)
    • Hybrid “actual result if we know it, otherwise predicted” results for each prediction set
    • 2019/2024 and predicted results for the four nations of the UK
    • Per-seat information:
    • The most recent results
    • The biggest swings (for results where the swing is known; there may be results which don’t yet have majority information)
    • Recent “surprises” where a surprise is deemed to be “a result where at least half the predictions were wrong”
    • “Contentious” constituencies – i.e. ones where the predictions disagree most with each other
    • Notable losses/wins – I’ve picked candidates that I think will be most interesting to users,
      mostly cabinet and shadow cabinet members.
    • All constituencies, in alphabetical order
  • The simple view (or in colour) doesn’t include predictions at all. It contains:
    • 2019 (notional) results and 2024 results so far
    • Recent results
    • Notable losses/wins
  • An introduction page so that most explanatory text can be kept off the main pages.

I have very little idea how much usage the site will get at all, but I’m hoping that folks who want a simple, up-to-date view of recent results will use the simple view, and those who want to check specific constituencies and see how the predictions are performing will use the full view.

The “colour mode” is optional because I’m really unsure whether I like it. In colour mode, results are colour-coded by party and (for predictions) likelihood. It does give an “at a glance idea” impression of the information, but only if you’ve checked which columns you’re looking at to start with.

Implementation

This is a coding blog, and the main purpose of writing this post was to give a bit of information about the implementation to anyone interested.

The basic architecture is:

  • ASP.NET Core Razor Pages, running on Google Kubernetes Engine (where my home page was already hosted)
  • Constituency information, “notable candidates” and predictions are stored in Google Drive
  • Result information for the site is stored in Firestore
  • Result information originates from the API of The Democracy Club
    and a separate process uploads the data to Firestore
  • Each server refreshes its in-memory result data every 10 seconds and candidate/prediction data every 10 minutes via a background hosted service

A few notes on each of these choices…

I was always going to implement this in ASP.NET Core, of course. I did originally look at making it a Cloud Function, but currently the Functions Framework for .NET doesn’t support Razor. It doesn’t really need to, mind you: I could just deploy straight on Cloud Run. That would have been a better fit in terms of rapid scaling to be honest; my web site service in my GKE cluster only has two nodes. The cluster itself has three. If I spot there being a vast amount of traffic on the night, I can expand the cluster, but I don’t expect that to be nearly as quick to scale as Cloud Run would be. Note to self: possibly deploy to Cloud Run as a backup, and redirect traffic on the night. It would take a bit of work to get the custom domain set up though. This is unlikely to actually be required: the busiest period is likely to be when most of the UK is asleep anyway, and the site is doing so little actual work that it should be able to support at least several hundred requests per second without any extra work.

Originally, I put all information, including results in Google Drive. This is a data source I already use for my local church rota, and after a little initial setup with credential information and granting the right permissions, it’s really simple to use. Effectively I load a single sheet from the overall spreadsheet in each API request, with a trivial piece of logic to map each row into a dictionary from column name to value. Is this the most efficient way of storing and retrieving data? Absolutely not. But it’s not happening often, and it does end up being really easy to read code, and the data is very easy to create and update. (As of 2024-06-24, I’ve added the ability to load several sheets within a single request, with unexpectedly simplified some other code too. But the “treat each row as a string-to-string dictionary” design remains.)

For each “prediction provider” I store the data using the relevant sheets from the original spreadsheets downloaded from the sites. (Most providers have a spreadsheet available; I’ve only had to resort to scraping in a couple of cases.) Again, this is inefficient – it means fetching data for columns I’ll never actually access. But it means when a provider releases a new poll, I can have the site using it within minutes.

An alternative approach would be to do what I’ve done for results – I could put all the prediction information in Firestore in a consistent format. That would keep the site code straightforward, moving the per-provider code to tooling used to populate the Firestore data. If I were starting again from scratch, I’d probably do that – probably still using Google Sheets as an intermediate representation. It doesn’t make any significant difference to the performance of the site, beyond the first few seconds after deployment. But it would probably be nice to only have a single source of data.

The “raw” data is stored in what I’ve called an ElectionContext – this is what’s reloaded by the background service. This doesn’t contain any processed information such as “most recent” results or “contentious results”. Each of the three page models then has a static cache. A request for a new model where the election context hasn’t changed just reuses the existing model. This is currently done by setting ViewData.Model in the page model, to refer to the cached model. There may well be a more idiomatic way of doing this, but it works well. The upshot is that although the rendered page isn’t cached (and I could look into doing that of course), everything else is – most requests don’t need to do anything beyond simple rendering of already-processed data.

I was very grateful to be informed about the Democracy Club API – I was expecting to have to enter all the result data manually myself (which was one reason for keeping it in Google Sheets). The API isn’t massively convenient, as it involves mapping party IDs to parties, ballot paper IDs to constituency IDs, and then fetching the results – but it only took a couple of hours to get the upload process for Firestore working. One downside of this approach is that I really won’t be able to test it before the night – it would be lovely to have a fake server (running the same code) that I could ask to “start replaying 2019 election results” for example… but never mind. (I’ve tested it against the 2019 election results, to make sure I can actually do the conversion and upload etc.) You might be expecting this to be hosted in some sort of background service as well… but in reality it’s just a console application which I’ll run from my laptop on the night. Nothing to deploy, should be easy to debug and fix if anything goes wrong.

In terms of the UI for the site itself, the kind way to put it would be “efficient and simplistic”. It’s just HTML and CSS, and no request will trigger any other requests. The CSS is served inline (rather than via a separate CSS resource) – it’s small enough not to be a problem, and that felt simpler than making sure I handled caching appropriately. There’s no JS at all – partly because it’s not necessary, and partly because my knowledge of JS is almost non-existent. Arguably with JS in place I could make it autorefresh… but that’s about all I’d want to do, and it feels like more trouble than it’s worth. The good news is that this approach ends up with a really small page size. In non-colour mode, the simple view is currently about 2.5K, and the full view is about 55K. Both will get larger as results come in, but I’d be surprised to see them exceed 10K and 100K respectively, which means the site will probably be among the most bandwidth-efficient way of accessing election data on the night.

Conclusion

I’ve had a lot of fun working on this. I’ll leave the site up after the election, possibly migrating the data all to Firestore at some point.

I’ve experienced yet again the joy of working on something slightly out of my comfort zone (I’ve learned bits of HTML and CSS I wasn’t aware of before, learned more about Razor pages, and used C# records more than elsewhere, and I love collection expressions) that is also something I want to use myself. It’s been great.

Unfortunately at the moment I can’t really make the code open source… but I’ll consider doing so after the election, as a separate standalone site (as opposed to part of my home page). It shouldn’t be too hard to do – although I should warn readers that the code is very much in the “quick and dirty hack” style.

Feedback welcome in the comments – and of course, I encourage the use of the site on July 4th/5th and afterwards…

DigiMixer – the app

This wasn’t the post I’d expected to write, but after reading two comments in close succession on an old post when I first started playing with the X-Touch Mini I decided to spend some time effectively shuffling code around (and adding a primitive configuration dialog) so I could publish a standalone app for DigiMixer.

I want to be really clear: the app is not “supported software”. I’ll try to fix bugs if they’re reported in the GitHub repo but it’s only “best-effort in my spare time”. If you don’t need any of the functionality that’s specific to the DigiMixer app (which as far as I’m aware is basically “control via X-Touch Mini and Icon Platform surfaces”) then I’d strongly recommend using Mixing Station instead. (Mixing Station supports full and X-Touch and X-Touch Extender surfaces, but doesn’t mention the X-Touch Mini. It may just work in Mackie mode; I haven’t tried it.)

Downloading the installer

The app can be downloaded from the “releases” page on GitHub – note that that’s also where the V-Drum Explorer is published, so be careful to pick the right file. You probably want the latest DigiMixer release, and download the .msix file. Run the file, and follow the prompts – you may get asked if you trust the author, “Jonathan Skeet”. That’s up to you, of course!

Configuration

On first run, a default configuration with a single input and a single output, talking to a fake mixer abstraction, will be created. Use the “Configure / Reconfigure” menu item to configure DigiMixer to talk to your actual mixer. You’ll be presented with a dialog like this:

DigiMixer app configuration

There are basically three stages to configuration:

  • Choose the mixer hardware type and specify the IP address. There’s no autodetection facility (of either address or hardware type), I’m afraid. Use the “Test configuration” button to check that DigiMixer is able to connect.
  • Choose which channels you want DigiMixer to control. The easiest way to start this is via the “Test configuration” button – if it successfully connects to your mixer, it will find all the channels with a non-empty name, and suggest a mapping based on those. But you don’t have to accept those mappings – you can edit, reorder, add and delete channels for both inputs and outputs. This means knowing the channel number that DigiMixer would use, but for input channels and aux channels that’s generally just the same channel number shown in the supplier-provided mixer user interface. Stereo channels are automatically detected, so only add the “left” channel. The main output “left” channel is always 100.
  • If you want to enable peripherals (and if you don’t, why are you using DigiMixer?) tick the “enable peripherals” box and pick the MIDI ports that correspond to the peripherals. (If they’re not connected at the time but you know what the names will be, you can just type them in.

That’s my first stab at the configuration user interface. I know it’s not pleasant, but it’s the best I could come up with in a very limited amount of time. (The configuration file lives in %LOCALAPPDATA%\DigiMixer and is just JSON, so if you’re feeling bold you can edit it by hand.)

The app window

The user interface itself is somewhat simpler than the configuration page:

DigiMixer app

By default, DigiMixer presents each input with a set of faders (one per output). This isn’t the normal way that most mixers show inputs, but it happens to be closer to what I personally use for church. If you want to group by output instead, just toggle the radio button in the top left. When grouping by input, there’s a separate panel for “overall output fader levels” at the bottom; when grouping by output, the panel at the bottom shows the meter levels for the inputs instead (without any faders).

You can show or hide channels within each group by checking or unchecking the checkboxes next to that. The tools on the right hand side should be fairly self-explanatory, although I should point out that snapshots probably won’t survive reconfiguration (as the identity of channels can be lost; it’s too complicated to explain in this post).

If you’re using an X-Touch Mini, the first eight input channels are controlled by the knobs and the top row of buttons. The knobs change the fader level for the main output of each channel, and the buttons mute and unmute. (When the button is lit, the channel is “on”; when the button is unlit, the channel is muted.) The bottom row of buttons control channels 9-16. Note that these “first eight” and “next eight” channels are in terms of how DigiMixer is configured; they’re not necessarily channels 1-8 and 9-16 on regular mixer inputs. The main fader on the X-Touch Mini controls the main overall output volume.

Similarly, the Icon Platform M+ controls channels 1-8, and X+ controls channels 9-16.

Conclusion

It’s possible that I’ll write more documentation for the app at some point, but this was never part of the plan for DigiMixer. I’m not looking to add more features other than additional mixers (and the support for different mixers varies significantly – the X-Air and X32 support is by far the most complete), although I’ll consider feature requests, of course.

The core aim of DigiMixer is still to explore the notion of abstraction, and I still hope to get to that properly in later posts! As it happens, refactoring my code to produce the app has made me consider a different kind of abstraction… the main user interface is used in DigiMixer, At Your Service, and an At-Your-Service-adjacent app which is designed to just run in the background, using configuration from At Your Service. So while the configuration dialog shown above is brand new, most of the user interface has been working in our church setting for a long time. More on that when I get into code, no doubt.

For the moment, I hope this meets the needs of folks hoping for a quick X-Touch Mini integration.

DigiMixer: Protocols

Despite this blog series going very slowly, the DigiMixer project itself has certainly not been stalled. Over the last year, I’ve added support for various additional mixers, as well as improving the support for some of the earlier ones, and performing quite a lot of refactoring.

DigiMixer now supports the following mixers, to a greater or lesser extent:

  • Behringer X series (tested with XR16, XR18, X-32R) and Midas M series (only tested with M32R, but I expect it to be identical to the X series)
  • Harman Soundcraft Ui series (tested with Ui24R)
  • Allen & Heath Qu series (tested with Qu-SB, including the AR84 stage box)
  • Allen & Heath CQ series (tested with CQ-20B)
  • RCF M-18
  • Mackie DL series (tested with DL16S and DL32R, which proved significantly difference)
  • Yamaha DM series (tested with DM-3)
  • PreSonus StudioLive Series III (tested with 16R)

In order to support each mixer, we have to be able to communicate with it. The only sort of “standardised” protocol used by the above mixers is OSC (Open Sound Control) – and that’s still only a matter of standardising what an OSC message looks like, not what the various addresses and values mean. Some mixers support MIDI to a certain extent, sometimes even with documentation around how that support works. (Again, there’s no one standard for how MIDI integration in a mixer “should” be implemented – it’s not like MIDI on actual instruments where you can reasonably expect a given MIDI message to mean “play middle C”.) That’s useful in terms of integration within a DAW, but none of the mixers I’ve seen so far provide sufficient control via MIDI to meet DigiMixer’s needs.

This post will go into a little detail about the protocols I’ve encountered so far, what we actually need for DigiMixer, and some practical aspects of how I’ve been reverse engineering the protocols.

I’m hoping to start writing more detailed documentation about each protocol within the GitHub repo, in the Protocols directory. There’s a bit of information about the Mackie DL series at the moment, with more to come when I find time. It’s worth being aware that any terminology I use within that directory is likely to be entirely unofficial – when I talk about a message “chunk size” or “subtype” etc, that’s just what I’ve used in the code for lack of a better term.

Very high level categorizations

Let’s start with the very highest levels of categorization for the protocol: everything DigiMixer supports uses the network to communicate, and all over IP. There may well be some digital mixers where the client/mixer connection is over USB, and as I mentioned before it’s also possible to control some mixers to some extent using MIDI (which could be via a USB-MIDI connection, dedicated MIDI hardware, or even MIDI over IP) – but I haven’t investigated any mixer protocols that aren’t network-oriented.

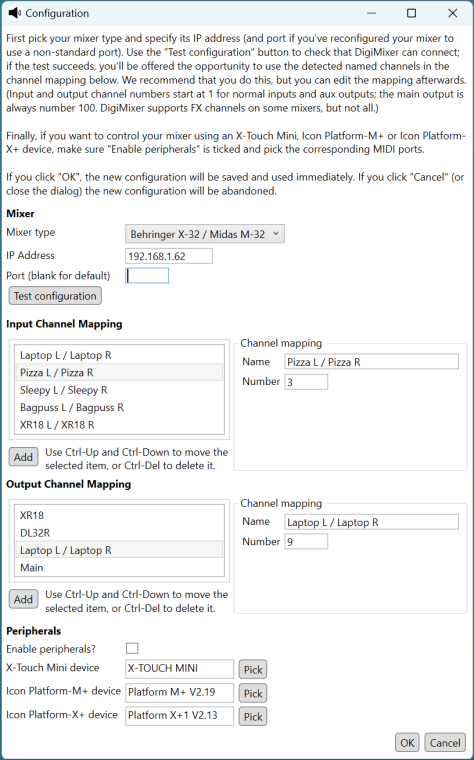
It’s worth being really clear about the difference between the “client/mixer” protocol and any “client/control surface” protocols. In the same repository as DigiMixer, I have some libraries for integration with the Icon Platform and X-Touch Mini control surfaces – both of which are integrated with DigiMixer via an application (which currently isn’t on public GitHub, unfortunately, as it shares configuration with At Your Service). One of the purposes of the abstraction of DigiMixer is to allow mixers to be treated as broadly interchangeable – so the same DigiMixer-based code that controls (say) a CQ-20B using an X-Touch Mini should be able to control an X32 with no changes. This post ignores the control surface aspects entirely, other than in terms of what we want to be able to do with DigiMixer, focusing on the client/mixer protocols.

The most obvious initial categorization of the protocols is in terms of transport (OSI layer 4) protocol: in our case, always UDP or TCP, or a mixture.

One fairly common pattern (used by the CQ, DM, Qu, StudioLive mixers) is to have a TCP connection for control aspects, but report meter levels over UDP. Meters show the point-in-time sound level for a particular input or output; typically it doesn’t matter if a meter packet is dropped every so often – so it makes sense to use UDP for that. It’s obviously rather more important if a “mute this channel” message is dropped, so the reliability of TCP is useful there.

The RCF M-18 and the X/M series of Behringer/Midas mixers use OSC over UDP. (The DM-3 also supports OSC over UDP, but doesn’t expose enough functionality to meet DigiMixer’s requirements.) The unreliability of UDP is worrying here; presumably the expectation is that you only operate them on sufficiently reliable networks that it’s not a problem, or that clients request “current state” peridiocally from the mixer and check it for consistency with their own expected state. My experience is that on a wired network with just a single switch between the mixer and the client (which would be the common deployment scenario), it’s never actually caused a problem.

The DL and Ui series only use TCP as far as I’ve seen (or at least as far as DigiMixer is concerned). The Ui series is particularly interesting here; its manufacturer-provided user interface is just a web UI. The mixer’s built-in web server serves the user interface itself, which connects back to the mixer still on port 80 to create a web socket connection. I don’t know enough about web socket standards to know how “normal” the implementation is, but it’s very simple to code against: issue a request of “GET /raw HTTP1.1”, read the response headers, and then it’s just a line-oriented protocol. Each message within the protocol (in both directions) is an ASCII line of text. I’ll come back to message formats later on.

Sources of information

Working on DigiMixer has been a fascinating exercise in piecing together information from multiple sources. Typically the implementation of each protocol has been relatively straightforward when I’ve had enough information of the protocol itself, but that information is hard to come by.

In some cases, the manufacturer has provided the information itself, either officially or unofficially. For the Ui series for example, Harman support responded to my enquiry really quickly, sending me documentation which was, while not fully comprehensive, easily enough to get started with. (They did stress that this documentation was in no way a guarantee of future compatibility or support.)

In other cases, there’s an active community with really strong efforts, including a mixture of official and unofficial documentation. The Behringer X series and Midas M series (which are basically the same in terms of software, as far as I can tell) have lots of active projects to access them via OSC, and the most comprehensive documentation comes from Patrick-Gilles Maillot’s site.

For the StudioLive mixers, there’s a GitHub project and documentation which are strictly unofficial and still at least somewhat incomplete – but invaluable. The situation is similar for the RCF M-18, where a single inactive GitHub repo is basically I could find.

For other mixers… there’s Wireshark. All the digital mixers I’ve looked at have manufacturer-supplied clients. When those run on Windows, it’s easy to just start Wireshark, open the client and (say) move a fader, then close the client and look at the traffic between the mixer and the client. Things are slightly more fiddly if the only client provided is an Android or iOS app, but I’ve found the TP-Link TL-SG105E to be really handy – it’s a small, silent, managed switch which supports port mirroring. So all I need to do is plug both my laptop and the mixer into the switch, mirror traffic from the mixer port to the laptop port, and again run Wireshark.

Mixing Station supports all of these mixers too, and sometimes it’s useful to look at the traffic between that and the mixer and compare it with the traffic between the manufacturer-supplied client and the mixer.

Of course, capturing the traffic between the mixer and the client doesn’t generally explain that traffic at all. We don’t need to understand all the traffic though – only enough for DigiMixer to be effective. So what does that consist of?

DigiMixer requirements for protocol comprehension

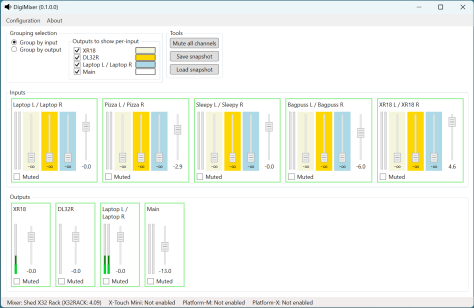
As I’ve said before, DigiMixer doesn’t try to be a full-fidelity mixer client. It only aims to provide control in terms of muting and unmuting, and moving faders (for either “overall output” or an “input/output combination” so “aux 1 level” or “input 2 level to aux 3” for example). Additionally, it attempts to provide information about channel names, general mixer information, any channels that are linked together to form stereo pairs, and meter information.

In protocol terms, that normally means we need to understand:

  • Initial connection requirements, including any “client handshake”. (For mixer TCP + UDP protocols, this handshake over TCP sometimes involves each side telling the other which UDP port they’re listening on.)
  • How to fetch mixer information (model, version, user-specified mixer name)
  • How to fetch the initial state of the mixer (channel names, any stereo links, and current fader/mute status)
  • How to send “mute/unmute this channel” and “move this fader” commands
  • What the mixer sends to the client if state is changed by another client
  • What the mixer sends to the client to report meter levels (potentially including how the client requests these in the first place)

Some protocols make those requirements very easy to fulfil – others are significantly more challenging.

Protocol layers and steps in reverse-engineering a protocol

I’ve never fully understood the OSI model, in terms of being able to clearly place any specific bit of a protocol into one of the seven layers. However, the idea of layering in general has been very useful within DigiMixer. Most of the implementations for mixers are implemented as two projects, one with a “core” suffix and one without, e.g. DigiMixer.Mackie.Core and DigiMixer.Mackie. The “core” project in each case is focused around what I expect would be the presentation layer (and sometimes the session layer) in OSI; I think of it in terms of message framing then message decomposition. (I believe that I’m using message framing in a perfectly standard way here. There’s probably a better name for message decomposition.)

All of the protocols used by DigiMixer have the idea of a message:

  • TCP connections form a bidirectional stream of messages
  • Each UDP connection forms a unidirectional stream of messages

(In some protocols the mixer uses UDP connections bidirectionally too – basically sending packets to whichever UDP port was used to send packets to it. In other protocols the two UDP streams are entirely separate.)

Message framing

With the UDP protocols I’ve seen implemented when working on DigiMixer, each UDP packet corresponds exactly to one message. There are never UDP packets which contain multiple messages, and a message never needs to be split across multiple packets.

With TCP, however, it’s a different story. Wireshark allows you to follow a TCP stream, showing the flow of data in each direction, but it takes a bit of work to figure out how to split each of those streams into messages.

Here’s part of the traffic I see in Wireshark when opening the DM-3 MixPad app in Windows, for example.

00000000  4d 50 52 4f 00 00 00 1d  11 00 00 00 18 01 01 01   MPRO.... ........
00000010  02 31 00 00 00 09 50 72  6f 70 65 72 74 79 00 11   .1....Pr operty..
00000020  00 00 00 01 80                                     .....
00000025  4d 50 52 4f 00 00 00 47  11 00 00 00 42 01 10 01   MPRO...G ....B...
00000035  04 11 00 00 00 01 00 31  00 00 00 09 50 72 6f 70   .......1 ....Prop
00000045  65 72 74 79 00 11 00 00  00 10 3a 7c 8d 4c 85 f8   erty.... ..:|.L..
00000055  9f 1e aa 83 4f 96 63 0c  ec 3d 11 00 00 00 10 8b   ....O.c. .=......
00000065  76 f3 98 78 64 6e 83 15  f5 81 7c 06 cc b6 91 4d   v..xdn.. ..|....M
00000075  50 52 4f 00 00 00 09 11  00 00 00 04 01 04 01 00   PRO..... ........
    00000000  4d 50 52 4f 00 00 00 47  11 00 00 00 42 01 10 01   MPRO...G ....B...
    00000010  04 11 00 00 00 01 00 31  00 00 00 09 50 72 6f 70   .......1 ....Prop
    00000020  65 72 74 79 00 11 00 00  00 10 3a 7c 8d 4c 85 f8   erty.... ..:|.L..
    00000030  9f 1e aa 83 4f 96 63 0c  ec 3d 11 00 00 00 10 87   ....O.c. .=......
    00000040  49 a1 3e 61 58 ea ce dc  00 0a cb 7d a1 dd cb      I.>aX... ...}...
    0000004F  4d 50 52 4f 00 00 00 09  11 00 00 00 04 01 04 01   MPRO.... ........
    0000005F  00 4d 50 52 4f 00 00 08  c3 11 00 00 08 be 01 14   .MPRO... ........

I suspect that the line break after the third line (between bytes 00000024 and 00000025 outbound) is due to a packet boundary, but it’s also possible that Wireshark is doing a little bit more than that, e.g. only showing a line break between packets if the gap between them (in terms of time) is above some threshold. I’ve generally ignored that, whereas “conversations” of short messages tend to make message boundaries fairly clear.

In this case, the repeated “MPRO” text at least appears at first glance to indicate the start of a message. The four bytes after that “MPRO” then seem to show (in big-endian order) the length of the remainder of the message.

In other words, after looking at a reasonable amount of data like the dump above, I was able to guess that the DM3 protocol had a message framing of:

  • 4 bytes: Message type (e.g. “MPRO”, “EEVT”, “MMIX”)
  • 4 bytes: Message body length, big-endian
  • Message body

A message framing hypothesis like that is reasonably easy to test, particularly after writing a bit of code to parse the text format of a Wireshark hex dump like the above. (My experience is that the text format is generally easier than having to deal with than the full pcapng files that Wireshark deals with by default. The amount of manual work required to follow the TCP stream and then save that as text is pretty small.)

Most of the protocols I’ve worked with have had some sort of “message header, message body” format, where the header includes information about the length of the body. There are some differences though:

  • Sometimes there’s some additional state (e.g. a “message counter byte”)
  • Sometimes the message header has no information other than framing, unlike the example above, where you really still need to keep the “MPRO” part as the “message type” – not that we know what “type” really means yet
  • Sometimes there’s a trailer (e.g. a checksum)
  • Sometimes the length information in the header is message length rather than bdoy length (i.e. the length can include or exclude the header itself, depending on the protocol)

In the case of the Ui series, the framing is just based on line breaks instead. These two schemes – “message delimiters” (line breaks) or “headers with length information” – are the main approaches to message framing that I’ve seen, not just in DigiMixer but over the course of my career. (It’s not clear whether you’d include the “single message per UDP packet” or “close the TCP connection after each message” message framing schemes, or just approaches that mean you don’t need message framing at all.) Some protocols have a mixture of the two: HTTP/1.1 uses delimiters for headers, then specifies a content length within one of the headers to allow further requests or responses to be sent on the same connection.

Once I’ve validated a message framing hypothesis in quick-and-dirty code (typically in another project with a Tools suffix, e.g. DigiMixer.Mackie.Tools) I’ll then add that framing into the “core” project, in the form of a message type implementing IMixerMessage:

public interface IMixerMessage<TSelf> where TSelf : class, IMixerMessage<TSelf>
{
    static abstract TSelf? TryParse(ReadOnlySpan<byte> data);
    int Length { get; }
    void CopyTo(Span<byte> buffer);
}

The addition of this interface into DigiMixer was a relatively new feature, as I was waiting for .NET 8 to land. It was predated by the concept of a “message processor” which effectively converts a stream of bytes into a stream of messages in a suitable form for consumption, but prior to the interface with its fun static abstract TryParse method, I had to specify various aspects of the message separately. Between the message interface, the message processor, and a couple of base classes, I now hardly have any code dealing with TcpClient and UdpClient directly. Lovely. (There are now multiple derived classes with hardly any behaviour, and I might refactor those at some point, but at least the logic isn’t repeated.)

Message decomposition

Confirming that I’ve understood the message framing for a protocol is immensely satisfying, and a necessary first step – but it also tends to be the simplest step. It’s often feasible to understand the message framing without understanding the whole of the message header, just as in the above example we don’t know what the different message types mean, or even how many message types there are. More importantly, even if we completely understand the framing, it doesn’t tell us anything about the meaning of those messages. They’re just blobs of data.

Message decomposition goes slightly further, taking the message body apart in terms of its constituent parts – potentially still without understanding the actual meaning of any values.

To take the DM-3 example shown above a bit further, it turns out that every message body that I’ve seen consists of:

  • Byte 0x11
  • 4 bytes, again a big-endian integer representing a length
  • That length in terms of bytes, as the “real” body

That’s just an extra (and redundant as far as I can tell) layer of wrapping, but within the “real” body we have a 4-byte set of flags (which do have some pattern to them, but I haven’t fully figured out) then a sequence of useful data in segments. Each segments consists of:

  • A type byte (always 0x11, 0x12, 0x14, 0x24 or 0x31 as far as I’ve seen); more on this below
  • The number of “units” being represented
  • The units themselves

The type byte consists of two nybbles – the first is the “kind” of units (1 for unsigned integers, including bytes; 2 for signed integers; 3 for characters) and then a second for “the number of bytes per unit”. So 0x11 is just a sequence of bytes, 0x12 is “a sequence of UInt16 values”, 0x14 is “a sequence of UInt32 values”, 0x24 is “a sequence of Int32 values, and 0x31 is basically “a string” (which is null-terminated despite also having a length, but hey).

The segments occur one after another, until the end of the “real” body.

So for the piece of hex shown earlier from the DM-3 (including a large message that was truncated), we can decompose those messages into:

=> MPRO: Flags=01010102; Segments=2
  Text: 'Property'
  Binary[1]: 80

=> MPRO: Flags=01100104; Segments=4
  Binary[1]: 00
  Text: 'Property'
  Binary[16]: 3A 7C 8D 4C 85 F8 9F 1E AA 83 4F 96 63 0C EC 3D
  Binary[16]: 8B 76 F3 98 78 64 6E 83 15 F5 81 7C 06 CC B6 91

=> MPRO: Flags=01040100; Segments=0

<= MPRO: Flags=01100104; Segments=4
  Binary[1]: 00
  Text: 'Property'
  Binary[16]: 3A 7C 8D 4C 85 F8 9F 1E AA 83 4F 96 63 0C EC 3D
  Binary[16]: 87 49 A1 3E 61 58 EA CE DC 00 0A CB 7D A1 DD CB

<= MPRO: Flags=01040100; Segments=0

<= MPRO: Flags=01140109; Segments=9
  Binary[1]: 00
  Text: 'Property'
  Text: 'Property'
  UInt16[*1]: 0000
  UInt32[*0]:
  UInt32[*0]:
  UInt32[*1]: 000000f0
  Binary[2164]: 4D 4D 53 58 4C 49 54 00 50 72 6F 70 65 72 74 79 [...]
  Binary[0]:

(My formatting is somewhat inconsistent here – I should probably get rid of the “*” in the lengths for UInt16/UInt32/Int32, but it doesn’t actually hurt the readability much… and this is just the output of a fairly quick-and-dirty tool.)

There’s still no application-level information here, but we can see the structure of the traffic – which makes it much, much easier to then discern bits of the application level protocol.

Application level protocol

Nothing I’ve described so far is mixer-specific. At some point, some combination of message type, flags and values has to actually mean something. Maybe it’s “please send me the version information about the mixer” or “this is the meter levels for the inputs” or “please mute the connection from input channel 1 to output channel 5”.

The process of reverse engineering the application level protocol involves both inspiration and perspiration – usually in that order, and only after working out at least a large proportion of the message framing and message decomposition. You don’t need to know everything, but you do need to know “if I move a fader on the mixer with a different client, I get a message back looking something like X.” That takes experimentation and some leaps of faith. But then you need to carefully document “well, what’s the difference between moving the fader for input 1, output 1 or moving the fader for input 2, output 5, or just an output fader?” – and “what’s the difference between moving the fader from the bottom of its range to a bit higher, and moving it a bit higher still?” That’s somewhat tedious, but still surprisingly rewarding work – so long as you can pay enough attention to transcribe your results to a log carefully enough.

I’m not going to attempt to describe (here) what the various protocols look like at an application level, because they vary so much (even if the lower abstraction levels are reasonably similar) – and because there’s so much I still don’t understand about them. Once I’ve written up some details, they’ll be on GitHub. But understanding how those abstraction levels work at all that’s been really interesting to me – and which I suspect will find useful in entirely different scenarios.

What’s next?

I think after diving into some of the slightly lower level bits of DigiMixer, the next post should probably be at a very high level, and back towards the goal of the whole blog series: abstraction. Assuming I don’t get distracted by something else to write about, I’ll try to make the next post as simple as “what do mixers have in common, and where do they differ, within the scope of DigiMixer?” After that, maybe the following post will be about what that abstraction looks like in code, and some of the trade-offs I’ve made along the way.

Variations in the VISCA protocol

Nearly three years ago, I posted about some fun I’d been having with VISCA using C#. As a reminder, VISCA is a camera control protocol, originally used over dedicated serial ports, but more recently over IP.

Until this week, all the cameras I’d worked with were very similar – PTZOptics, Minrray and ZowieTek all produce hardware which at least gives the impression of coming out of the same factory, with the same “base” firmware that’s then augmented by the specific company. I’ve seen differences in the past, but they’re largely similar in terms of VISCA implementation.

This week, my Obsbot Tail Air arrived. I’ve been looking at Obsbot for a while, attracted by the small form factor, reasonable price, and fun object tracking functionality. However, earlier models didn’t have the combination of the two features I was most interested: VISCA and NDI support. The Tail Air has both. I bought it in the hope that I could integrate it with my church A/V system (At Your Service) – allowing for auto-tracking and portability (as the Tail Air is battery powered and wireless).

The NDI integration worked flawlessly from the start. Admittedly the Tail Air takes a lot of bandwidth by default – I’ve turned the bitrate down to “low” in order to get to a reasonable level (which still looks great). But fundamentally it just worked.

VISCA was trickier – hence this blog post. First, there wasn’t documentation on whether it was using TCP or UDP, or which port it was listening on. To be clear, the product’s only just launched, and I’m sure the documentation will improve over time. Fortunately, there was information on the Facebook group, suggesting that other people had got some VISCA clients working with UDP port 52381.

To start with, that was going to cause a bit of a problem as my implementation only supported TCP. However, it was pretty easy to change it to support UDP; the code had already been written to isolate the transport from other aspects, at least to some extent. Fortunately, the PTZOptics camera supports both TCP and UDP, so it was easy to test the UDP implementation that way.

Unfortunately, the implementation that worked for my PTZOptics camera entirely failed for the Tail Air. After doing a bit of digging, I found out why.

It turns out that there are two variants of VISCA over IP – what I’ve called “raw” and “encapsulated”, but that’s definitely not official terminology. In the “raw” version, each message is between 3 and 16 bytes:

  • The first byte designates the type of message, the source and destination devices, and normal/broadcast mode.
  • There are 1-14 “payload” bytes
  • The last byte is always 0xff (and no other byte ever should be)

The “encapsulated” version uses the same data part as the “raw” version, but with an additional header of 8 bytes:

  • The first two bytes indicate the message “type” (command, inquiry, reply, device setting, control, control reply)
  • The next two bytes indicate the length of the data to follow (even though it’s never more than 16 bytes…)
  • The final four header bytes indicate a sequence number (initially 00 00 00 00, then 00 00 00 01 etc)

So for example, the raw command for “get power status” is 81-09-04-00-ff.

The encapsulated command for the same request (with a sequence number of 00-00-00-00) is 01-10-00-05-00-00-00-00-81-09-04-00-FF.

Once I’d figured that out (and hand-crafted the “get power status” packet to check that I was on the right lines), the rest was fairly straightforward. My VISCA library now allows the use of TCP or UDP, and raw or encapsulated format.

The Tail Air still doesn’t behave quite the same as my PTZOptics camera in terms of VISCA support, mind you:

  • It ignores power standby/on commands.
  • The “set pan/tilt” command ignores the specified tilt speed, using the pan speed for both pan and tilt.
  • The “set pan/tilt” command replies that it’s completed immediately – instead of waiting until the camera has actually finished moving.
  • The pan/tilt and zoom limits are (understandably) different.

Still, none of that should prevent fuller integration within At Your Service. I need to take account of the different pan/tilt/zoom limits within At Your Service, allowing them to be configurable, but after that I should have a reasonably workable system… as well as a handy little test camera to take for demo purposes!

All the code changes can be seen in the CameraControl directory of my demo code GitHub repo.

The Tail Air is not the only new toy I’ve received this week… I’ve also taken delivery of an Allen & Heath CQ20B digital mixer, so I’ve been playing with that today as well, trying to work out how to integrate that into DigiMixer. I’m really hoping to get a chance to write some more blog posts on DigiMixer over the Christmas holidays… watch this space.

SSC Protocol

I’m aware that I haven’t been writing as many blog posts as I’d hoped to about DigiMixer. I expect the next big post to be a comparison of the various protocols that DigiMixer supports. (I’ve started a protocols directory in the GitHub repo, but there isn’t much there yet.) In the meantime, I wanted to mention a protocol that I just recently integrated… SSC.

SSC stands for “Sennheiser Sound Control” – it’s based on OSC (Open Sound Control), the binary protocol that I already use for controlling Behringer mixers and the RCF M-18. SSC is very similar to OSC in terms of its structure of path-like addresses to refer to values (e.g. “/device/identity/product”) but uses JSON as the representation. The addresses are represented via nested objects: to request a value you specify the null literal in the request, whereas to set a value you specify the new value. So for example, a request for a device’s product name, serial number and current time might look like this:

{
  "device": {
    "time": null,
    "identity" {
      "serial": null,
      "product": null
    }
  }
}

Not only is this nice and easy to work with, but it’s all documented. For example, the specification for the EW-DX EM 2 radio microphone receiver (which is the device I have) can be downloaded here. I can’t tell you how delightful it is to read a well-written specification before starting to write any integration code. There are a few aspects that it doesn’t cover in as much detail as I’d like (e.g. errors) but overall, it’s a joy.

Obviously a radio microphone receiver isn’t actually a mixer – while I could sort of squint and pretend it is (it’s got mutes and sound levels, after all) I haven’t done that… this is really for integration into At Your Service, so that I can alert the operator if microphone battery levels are running low. Given the relationship between OSC and SSC, however, it made sense to include it in the DigiMixer code base – even with tests for the abstraction I’ve created over the top. (No, having tests isn’t normally noteworthy – but my integration projects normally don’t include many tests as the big “unknown” is more what the device does rather than how the code behaves.)

Due to a combination of existing code in DigiMixer for handling “establish a client/server-like relationship over UDP”, the clear documentation, and my previous experience with OSC, I was able to get my new radio mic receiver integrated into At Your Service within a few hours. I’m sure I’ll want to tweak it over time – but overall, I’m really pleased at how easy it was to add this. I don’t expect to actually display the details to most users, but here they are for diagnostic purposes:

SSC details screenshot

And the status bar with just battery levels:

Battery levels screenshot

Onward and upward!

DigiMixer: Introduction to digital mixers

While I’m expecting this blog post series to cover a number of topics, the primary purpose is as a vehicle for discussing abstraction and what it can look like in real-world projects instead of the “toy” examples that are often shown in books and articles. While the DigiMixer project itself is still in some senses a toy project, I do intend to eventually include it within At Your Service (my church A/V system) and my aim is to examine the real problems that come with introducing abstraction.

In this post, I’ll cover the very basics of what we’re trying to achieve with DigiMixer: the most fundamental requirements of the project, along with the highest-level description on what a digital audio mixer can do (and some terminology around control surfaces). Each of the aspects described here will probably end up with a separate post going into far more detail, particularly highlighting the differences between different physical mixers.

Brief interlude: Mixing Station

When I wrote the introductory DigiMixer blog post I was unaware of any other projects attempting to provide a unified software user inferface to control multiple digital mixers. I then learned of Mixing Station – which does exactly that, in a cross-platform way.

I’ve been in touch with the author, who has been very helpful in terms of some of the protocol details, but is restricted in terms of what he can reveal due to NDAs. I haven’t yet explored the app in much depth, but it certainly seems comprehensive.

DigiMixer is in no way an attempt to compete with Mixing Station. The goal of DigiMixer is primarily education, with integration into At Your Service as a bonus. Mixing Station doesn’t really fit into either of those goals – and DigiMixer is unlikely to ever be polished enough to be a viable alternative for potential Mixing Station customers. If this blog post series whets your appetite for digital audio mixers, please look into Mixing Station as a control option.

What is a digital audio mixer?

I need to emphasize at this stage that I’m very much not an audio engineer. While I’ll try to use the right terminology as best I can, I may well make mistakes. Corrections in comments are welcome, and I’ll fix things where I can.

A digital audio mixer (or digital mixer for short from here onwards – if I ever need to refer to any kind of mixer other than an audio mixer, I’ll do so explicitly) is a hardware device which accepts a number of audio inputs, provides some processing capabilities, and then produces a number of audio outputs.

The “digital” aspect is about the audio processing side of things. There are digital mixers where every aspect of human/mixer interaction is still analogue via a physical control surface (described in more detail below). Many other digital mixers support a mixture of physical interaction and remote digital control (typically connected via USB or a network, with applications on a computer, tablet or phone). Some have almost no physical controls at all, relying on remote control for pretty much everything. This latter category is the one I’m most familiar with: my mixers are all installed in a rack, as shown below.

Rack containing digital mixers

My shed mixer rack, December 2022 – the gap in the middle is awaiting an Allen and Heath Qu-SB, on back-order.

The only mixer in the rack that provides significant physical control is the Behringer X-32 Rack, just below the network switch in the bottom rack. It has a central screen with buttons and knobs round the side – but even in this case, you wouldn’t want to use those controls much in a live situation. They’re more for set-up activities, in my view.

Most of the other mixers just have knobs for adjusting head-phone output and potentially main output. Everything else is controlled via the network or USB.

Control surfaces

Even though DigiMixer doesn’t have any physical controls (yet), the vocabulary I’ll use when describing it is intended to be consistent with that of physical control surfaces. Aside from the normal benefits of consistency and familiarity, this will help if and when I allow DigiMixer to integrate with dedicated control surfaces such as the X-Touch Mini, Monogram or Icon Platform M+.

Before getting into mixers, I wasn’t even aware of the term control surface but it appears to be ubiquitous – and useful to know when researching and shopping. I believe it’s also used for aircraft controls (presumably including flight simulators) and submarines.

While mixers often have control surfaces as part of the hardware, dedicated control surfaces (such as the ones listed above) are also available, primarily for integration with Digital Audio Workstations (DAWs) used for music recording and production. Personally I’ve always found DAWs to be utterly baffling, but I’m certainly not the target audience. (If I’d understood them well in 2020, they could potentially have saved me a lot of time when editing multiple tracks for the Tilehurst Methodist Church virtual choir items, but Audacity)

Faders

Faders are the physical equivalent to slider controls in software: linear controls which move along a fixed track. These are typically used to control volume/gain.

When you get past budget products, many control surfaces have motorised faders. These are effectively two-way controls: you can move them with your fingers to change the logical value, or if the logical value is changed in some other way, e.g. via a DAW, the fader will physically move to reflect that.

Faders generally do exactly what they say on the tin – and are surprisingly satisfying to use.

Buttons

For what sounds like an utterly trivial aspect of control, there are a few things to consider when it comes to physical buttons.

The first is whether they’re designed for state or for transition. The controls around the screen of the X-32 Rack mixer demonstrate this well:

There’s a set of four buttons (up/down/left/right) used to navigate within the user interface:

Plain navigation buttons

There are buttons to the side of the screen which control and indicate which “page” of the user interface is active:

Lit navigation buttons

There are on/off buttons such as for toggling muting, solo, and talkback. (I’ll talk more about those features later on… hopefully muting is at least reasonably straightforward.)

Lit toggle buttons

Secondly, a state-oriented button may act in a latching or momentary manner. A latching button toggles each time you press it: press it once to turn it on (whatever that means for the particular button), press it again to turn it off. A momentary button is only “on” while you’re pressing it. (This is also known as “push-to-talk” in some scenarios.) In some cases the same button can be configured to be “sometimes latching, sometimes momentary” – which can cause confusion if you’re not careful.

The most common use case for buttons on a mixer is for muting. On purely-physical mixers, mute buttons are usually toggle buttons where the state is indicated by whether the button is physically depressed or not (“in” or “out”). On the digital mixers I’ve used, most buttons (definitely including mutes) are semi-transparent rubberised buttons which are backlit – using light to represent state is much clearer at-a-glance than physical position. Where multiple buttons are placed close together, some control surfaces use different light colours to differentiate between them. I’ve seen just a few cases where a single physical button uses different light colours to give even more information.

Rotary encoders, aka knobs

While I’ve been trying to modify my informal use of terminology to be consistent with industry standards, I do find it hard to use “rotary encoder” for what everyone else I know would just call a knob. I suspect the reasons for the more convoluted term are a) to avoid sexual connotations; b) to sound more fancy.

Like faders, knobs are effectively continous controls (as opposed to the usually-binary nature of buttons) – it’s just that the movement is rotational instead of linear.

On older mixers, knobs are often limited in terms of the minimum and maximum rotation, with a line on the knob to indicate the position. This style is still used for some knobs on modern control surfaces, but others can be turned infinitely in either direction, reporting changes to the relevant software incrementally rather than in terms of absolute position. Lighting either inside the knob itself or around it is often used to provide information about the logical “position” of the knob in this case.

Lit volume knob

Some knobs also act as buttons, although I personally find pushing-and-twisting to be quite awkward, physically.

Jog wheel / shuttle dial

I haven’t actually seen jog wheels on physical mixers, but they’re frequently present on separate control surfaces, typically for use with DAWs. They’re large rotational wheels (significantly larger than knobs); some spring back to a central position after being released, whereas others are more passive. In DAWs they’re often used for time control, scrolling backward and forward through pieces of audio.

I mention jog wheels only as a matter of completeness; they’re not part of the abstraction I need to represent in DigiMixer.

Meters

Meters aren’t really controls as such, but they’re a crucial part of the humn/machine interface on mixers. They’re used to represent amounts of signal at some stage of processing (e.g. the input for a microphone channel, or the output going to a speaker). In older mixers a meter might consist of several small lights in a vertical line, where a higher level of signal leads to a larger number of lights being lit (starting at the bottom). Sometimes meters are a single color (and if so, it’s usually green); other meters go from mostly green to yellow near the top to red at the very top to warn the user when the signal is clipping.

Meters sometimes have a peak indicator, showing the maximum signal level over some short-ish period of time (a second or so).

How are digital mixers used?

This is where I’m on particularly shaky ground. My primary use case for a mixer is in church, and that sort of “live” setup can probably be lumped in with bands doing live gigs (using their own mixers), along with pubs and bars with occasional live sound requirements (where the pub/bar owns and operates the equipment, with guest talent or maybe just someone announcing quiz questions etc). Here, the audio output is heard live, so the mixing needs to be “right” in the moment.

Separately, mixers are used in studio setups for recording music, whether that’s a professional recording studio for bands etc or home use. This use case is much more likely to use a DAW afterwards for polishing – so a lot of the task is simply to get each audio track recorded separately with as little interference as possible. A mixer can be used as a way of then doing the post-processing (equalizing, compression, filters, effects etc); I don’t know enough about the field to know whether that’s common or whether it’s usually just done in software on a regular computer.

Focusing on the first scenario, there are two distinct phases:

  • Configuring the mixer as far as possible beforehand
  • Making adjustments on-the-fly in response to what’s happening in the room

The on-the-fly adjustments (at least for a rank amateur such as myself) are:

  • Muting and unmuting individual input channels
  • Adjusting the volume of individual input/output combinations (e.g. turning up one microphone’s output for the portion of our church congregation on Zoom, while leaving it alone for the in-building congregation)
  • Adjusting the overall output volumes separately

What is DigiMixer going to support?

Selfishly, DigiMixer is going to support my use case, and very little else. Even within “stuff I do”, I’m not aiming to support the first phase where the mixer is configured. This doesn’t need any integration into At Your Service – if multiple churches each with their own mixer each have a different mixer model, that’s fine… the relevant tech person at the church can set the mixer up with the app that comes with the mixer. If they want to add some reverb, or add a “stereo to mono” effect (which we have at Tilehurst Methodist Church) or whatever, that doesn’t need to be part of what’s controlled in the “live” second phase.

This vastly reduces the level of detail in the abstraction. I’ve gone into a bit more detail in the section below to give more of an idea of the amount of work I’m avoiding, but what we do need in DigiMixer is:

  • Whether the mixer is currently connected
  • Input and output channel configuration (how many, names, mono vs stereo)
  • Muting for inputs and outputs
  • Meters for inputs and outputs
  • Faders for input/output combinations
  • Faders for overall outputs

What is DigiMixer not going to support?

I have a little experience in trying to do “full fidelity” (or close-to full fidelity) companion apps – my V-Drum Explorer app attempts to enable every aspect of the drum kit to be configured, which requires knowledge of every aspect of the data model. In the case of Roland V-Drums, there’s often quite a lot of documentation which really helps… I haven’t seen any digital mixers with that level of official documentation. (The X32 has some great unofficial documentation thanks to Patrick-Gilles Maillot, but it’s still not quite the same.)

Digital mixers have a lot of settings to consider beyond what DigiMixer represents. It’s worth running through them briefly just to get more of an idea of the functionality that digital mixers provide.

Channel input settings

Each input channel has multiple settings, which can depend on the input source (analog, USB, network etc). Common settings for analog channels are:

  • Gain: the amount of pre-amp gain to apply to the input before any other signal processing. This is entirely separate from the input channel’s fader. (As a side-note, the number of places you effectively control the volume of a signal as it makes its way through the system can get a little silly.)
  • Phantom power: whether the mixer should provide 48v phantom power to the physical input. This is usually used to power condenser microphones.
  • Polarity: whether to invert the phase of the signal
  • Delay: a customizable delay to the input, used to synchronize sound from sources with different natural delays

“Standard” signal processing

Most mixers allow very common signal processing to apply to each input channel individually:

  • A gate reduces noise by effectively muting a channel completely when the signal is below a certain threshold – but with significantly more subtlety. A gate typically has threshold, attack, release and hold parameters.
  • A compressor reduces the dynamic range of sound, boosting quiet sounds and taming loud ones. (I find it interesting that this is in direct contrast to high dynamic range features in video processing, where you want to maximize the range.)
  • An equalizer adjusts the volume of different frequency bands.

Effects (FX) processing

Digital mixers generally provide a fixed set of FX “slots”, allowing the user to choose effects such as reverb, chorus, flanger, de-esser, additional equalization and others. A single mixer can offer many, many effects (multiple reverbs, multiple choruss etc).

Not only does each effect option have its own parameters, but there are multiple ways of applying the effect, via side-chaining or as an insert. Frankly, it gets complicated really quickly – multiple input channels can send varying amounts of signal to an FX channel, which processes the combination and then contributes to regular outputs (again, by potentially varying amounts).

I’m sure it all makes sense really, but as a novice audio user it makes my head hurt. Fortunately I haven’t had to do much with effects so far.

Routing

Routing refers to how different signals are routed through the mixer. In a very simple mixer without any routing options, you might have (say) 4 input sockets and 2 output sockets. Adjusting “input 1” (e.g. with the first fader) would always adjust how the sound coming through the first input socket is processed. In digital mixers, things tend to get much more complicated, really quickly.

Let’s take my X32 Rack for example. It has:

  • 16 XLR input sockets for the 16 regular “local” inputs
  • 6 aux inputs (1/4″ jack and RCA)
  • A talkback input socket
  • A USB socket used for media files (both to play and record)
  • 8 XLR main output sockets
  • 6 aux outputs (1/4″ jack and RCA)
  • A headphone socket
  • Two AES50 ethernet sockets for audio-over-ethernet, each of which can have up to 48 inputs and 48 outputs. (The X32 can’t handle quite that many inputs and outputs, but it can work with AES50 devices which do, and address channels 1-48 on them.)
  • An ultranet monitoring ethernet socket (proprietary audio-over-ethernet to Behringer monitors)
  • A “card” which supports different options – I have the USB audio interface card, but other options are available.

(These are just the sockets for audio; there are additional ethernet and MIDI sockets for control.)

How should this vast set of inputs be mapped to the 32 (+8 FX) usable input channels? How should 16 output channels be mapped to the vast set of outputs? It’s worth noting that there’s an asymmetry here: it doesn’t make sense to have multiple configured sources for a single input channel, but it does make sense to send the same output (e.g. “output channel 1”) to multiple physical devices.

As an example, in my setup:

  • Input channels 1-16 map to the 16 local XLR input sockets on the rack
  • Input channels 17-24 map to input channels 1-8 on the first AES50 port, which is connected to a Behringer SD8 stage box (8 inputs, 8 outputs)
  • Input channels 25-32 map to channels 1-8 via the USB port
  • Output channels 1-8 map to the local output XLR sockets and to the first AES50 port’s outputs 1-8 and to channels 9-16 via the USB port
  • Output channels 9-16 map to channels 1-8 via the USB port (yes, that sounds a little backwards, but it happens to simplify using the microphones)
  • The input channels 1-8 from the first AES50 port are also mapped to output channels 17-24 on the USB port
  • The output channels 1-8 on the USB port are also mapped to input channels 25-32 on the USB port.

Oh, and there are other options like having an oscillator temporarily take over an output port. This is usually used for testing hardware connections, although I’ve used this for reverse engineering protocols – a steady, adjustable output is really useful. Then there are options for where talkback should go, how the aux inputs and outputs are used, and a whole section for “user in” and “user out” which I don’t understand at all.

All of this is tremendously powerful and flexible – but somewhat overwhelming to start with, and the details are different for every mixer.

General settings

Each digital mixer has its own range of settings, such as:

  • The name of the mixer (so you can tell which is which if you have multiple mixers)
  • Network settings
  • Sample rates
  • MIDI settings
  • Link preferences (for stereo linked channels)
  • User interface preferences

That’s just a small sample of what’s available in the X32 – there are hundreds of settings, many cryptically described (at least to a newcomer), and radically different across mixers.

Conclusion

When I started writing this blog post, I intended it to mostly focus on the abstraction I’ll be implementing in DigiMixer… but it sort of took on a life of its own as I started describing different aspects of digital mixers.

In some ways, that’s a good example of why abstractions are required. If I tried to describe everything about even one of the mixers I’ve got, that would be a very long post indeed. An abstraction aims to move away from the detail, to focus on the fundamental aspects that all the mixers have in common.

This series of blog posts won’t be entirely about abstractions, even though that’s the primary aim. I’ll go into some comparisons of the network protocols supported by the various mixers, and particular coding patterns too.

There’s already quite a bit of DigiMixer code in my democode repository – although it’s in varying states of production readiness, let’s say. I expect to tidy it up significantly over time.

I’m not sure what I’ll write about next in terms of DigiMixer, but I hope the project be as interesting to read about as it’s proving to explore and write about.